这次介绍一下经典的 UNet 网络模型。
参考资料
先看一张图片
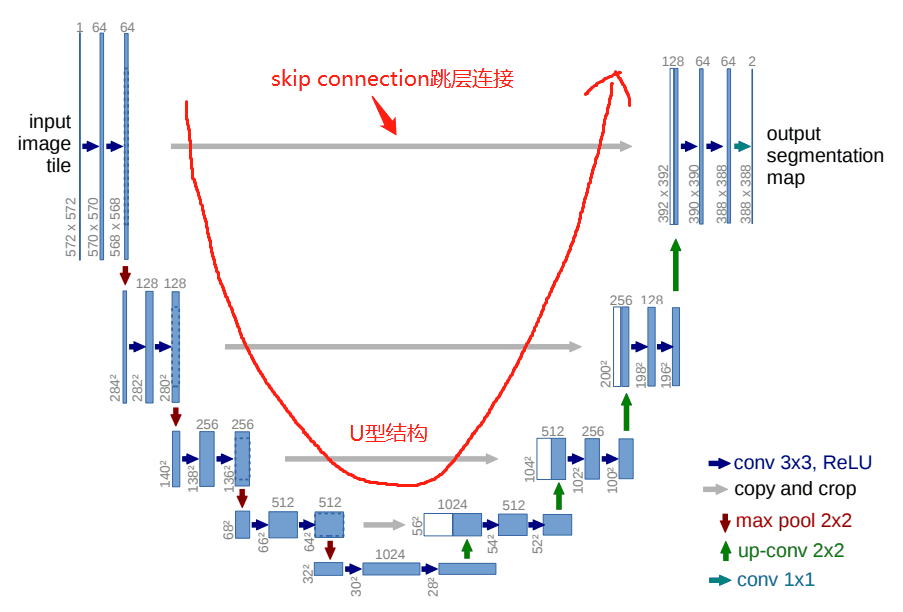
UNet是一个对称的网络结构,左侧为下采样,右侧为上采样。
按照功能可以将左侧的一系列下采样操作称为encoder,将右侧的一系列上采样操作称为decoder。
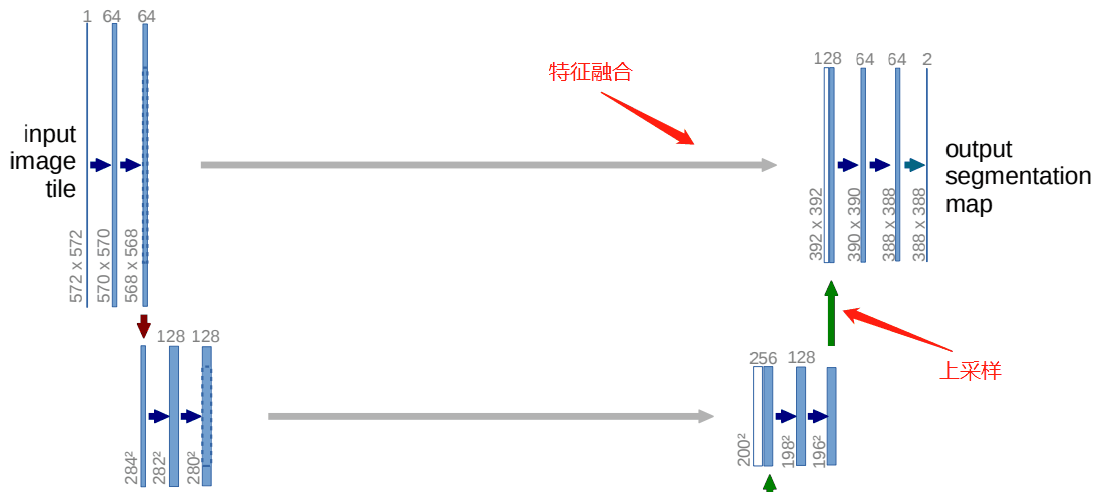
Skip Connection中间四条灰色的平行线,Skip Connection就是在上采样的过程中,融合下采样过过程中的feature map。
单元组件
DoubleConv 模块
1
2
3
4
5
6
7
8
9
10
11
12
13
14
15
|
class DoubleConv(nn.Module):
def __init__(self, in_ch, out_ch):
super(DoubleConv, self).__init__()
self.conv = nn.Sequential(
nn.Conv2d(in_ch, out_ch, 3, padding=1),
nn.BatchNorm2d(out_ch),
nn.ReLU(inplace=True),
nn.Conv2d(out_ch, out_ch, 3, padding=1),
nn.BatchNorm2d(out_ch),
nn.ReLU(inplace=True)
)
def forward(self, input):
return self.conv(input)
|
DoubleConv模块的
可以灵活设定,以便扩展使用。
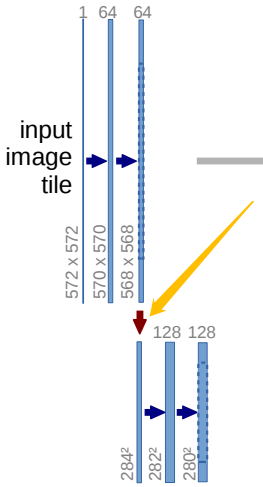
如上图中,左上角所示的网络,in_ch 设为 1 ,out_cha为64。
输入图片大小为572*572,经过步长为1,padding为0的3*3卷积,得到570*570的feature map,再经过一次卷积得到568*568的feature map。
相关的公式为
Down模块
UNet网络一共有4次下采样过程,模块化代码如下:
1
2
3
4
5
6
7
8
9
10
11
12
| class Down(nn.Module):
"""Downscaling with maxpool then double conv"""
def __init__(self, in_channels, out_channels):
super().__init__()
self.maxpool_conv = nn.Sequential(
nn.MaxPool2d(2),
DoubleConv(in_channels, out_channels)
)
def forward(self, x):
return self.maxpool_conv(x)
|
这里的代码很简单,就是一个maxpool池化层,进行下采样,然后接一个DoubleConv模块。
至此,UNet网络的左半部分的下采样过程的代码都写好了,接下来是右半部分的上采样过程。
Up模块
上采样过程用到的最多的当然就是上采样了,除了常规的上采样操作,还有进行特征的融合。
这块的代码实现起来也稍复杂一些:
1
2
3
4
5
6
7
8
9
10
11
12
13
14
15
16
17
18
19
20
21
| class Up(nn.Module):
"""Upscaling then double conv"""
def __init__(self, in_channels, out_channels):
super().__init__()
self.up = nn.ConvTranspose2d(in_channels, in_channels // 2, kernel_size=2, stride=2)
self.conv = DoubleConv(in_channels, out_channels)
def forward(self, x1, x2):
x1 = self.up(x1)
diffY = torch.tensor([x2.size()[2] - x1.size()[2]])
diffX = torch.tensor([x2.size()[3] - x1.size()[3]])
x1 = F.pad(x1, [diffX // 2, diffX - diffX // 2,
diffY // 2, diffY - diffY // 2])
x = torch.cat([x2, x1], dim=1)
return self.conv(x)
|
这里面既有上采样,又有特征融合。
上采样
上采样使用的是反卷积。
可以参考
上采样主要是针对 x1。
特征融合
特征融合主要是灰线的代码。有一点残差网络的概念。
Skip Connection「灰线」用到的融合的操作也很简单,就是将feature map的通道进行叠加,俗称Concat。
Concat操作也很好理解,举个例子:一本大小为10cm*10cm,厚度为3cm的书A,和一本大小为10cm*10cm,厚度为4cm的书B。
将书A和书B,边缘对齐地摞在一起。这样就得到了,大小为10cm*10cm厚度为7cm的一摞书,类似这种:
这种“摞在一起”的操作,就是Concat。
同样道理,对于feature map,一个大小为256*256*64的feature map,即feature map的w(宽)为256,h(高)为256,c(通道数)为64。和一个大小为256*256*32的feature map进行Concat融合,就会得到一个大小为256*256*96的feature map。
在实际使用中,Concat融合的两个feature map的大小不一定相同,例如256*256*64的feature map和240*240*32的feature map进行Concat。
这种时候,就有两种办法:
第一种:将大256*256*64的feature map进行裁剪,裁剪为240*240*64的feature map,比如上下左右,各舍弃8 pixel,裁剪后再进行Concat,得到240*240*96的feature map。
第二种:将小240*240*32的feature map进行padding操作,padding为256*256*32的feature map,比如上下左右,各补8 pixel,padding后再进行Concat,得到256*256*96的feature map。
UNet采用的Concat方案就是第二种,将小的feature map进行padding,padding的方式是补0,一种常规的常量填充。
代码
unet_parts.py
1
2
3
4
5
6
7
8
9
10
11
12
13
14
15
16
17
18
19
20
21
22
23
24
25
26
27
28
29
30
31
32
33
34
35
36
37
38
39
40
41
42
43
44
45
46
47
48
49
50
51
52
53
54
55
56
57
58
59
60
61
62
63
64
65
66
67
68
| """ Parts of the U-Net model """
"""https://github.com/milesial/Pytorch-UNet/blob/master/unet/unet_parts.py"""
import torch
import torch.nn as nn
import torch.nn.functional as F
class DoubleConv(nn.Module):
"""(convolution => [BN] => ReLU) * 2"""
def __init__(self, in_channels, out_channels):
super().__init__()
self.double_conv = nn.Sequential(
nn.Conv2d(in_channels, out_channels, kernel_size=3, padding=0),
nn.BatchNorm2d(out_channels),
nn.ReLU(inplace=True),
nn.Conv2d(out_channels, out_channels, kernel_size=3, padding=0),
nn.BatchNorm2d(out_channels),
nn.ReLU(inplace=True)
)
def forward(self, x):
return self.double_conv(x)
class Down(nn.Module):
    """Downscaling with maxpool then double conv"""

    def __init__(self, in_channels, out_channels):
        super().__init__()
        self.maxpool_conv = nn.Sequential(
            nn.MaxPool2d(2),
            DoubleConv(in_channels, out_channels)
        )

    def forward(self, x):
        return self.maxpool_conv(x)
class Up(nn.Module):
"""Upscaling then double conv"""
def __init__(self, in_channels, out_channels):
super().__init__()
self.up = nn.ConvTranspose2d(in_channels, in_channels // 2, kernel_size=2, stride=2)
self.conv = DoubleConv(in_channels, out_channels)
def forward(self, x1, x2):
x1 = self.up(x1)
diffY = torch.tensor([x2.size()[2] - x1.size()[2]])
diffX = torch.tensor([x2.size()[3] - x1.size()[3]])
x1 = F.pad(x1, [diffX // 2, diffX - diffX // 2,
diffY // 2, diffY - diffY // 2])
x = torch.cat([x2, x1], dim=1)
return self.conv(x)
class OutConv(nn.Module):
def __init__(self, in_channels, out_channels):
super(OutConv, self).__init__()
self.conv = nn.Conv2d(in_channels, out_channels, kernel_size=1)
def forward(self, x):
return self.conv(x)
|
unet_model.py
1
2
3
4
5
6
7
8
9
10
11
12
13
14
15
16
17
18
19
20
21
22
23
24
25
26
27
28
29
30
31
32
33
34
35
36
37
38
39
40
41
42
43
| """ Full assembly of the parts to form the complete network """
"""Refer https://github.com/milesial/Pytorch-UNet/blob/master/unet/unet_model.py"""
import torch.nn.functional as F
from unet_parts import *
class UNet(nn.Module):
def __init__(self, n_channels, n_classes):
super(UNet, self).__init__()
self.n_channels = n_channels
self.n_classes = n_classes
self.bilinear = bilinear
self.inc = DoubleConv(n_channels, 64)
self.down1 = Down(64, 128)
self.down2 = Down(128, 256)
self.down3 = Down(256, 512)
self.down4 = Down(512, 1024)
self.up1 = Up(1024, 512)
self.up2 = Up(512, 256)
self.up3 = Up(256, 128)
self.up4 = Up(128, 64)
self.outc = OutConv(64, n_classes)
def forward(self, x):
x1 = self.inc(x)
x2 = self.down1(x1)
x3 = self.down2(x2)
x4 = self.down3(x3)
x5 = self.down4(x4)
x = self.up1(x5, x4)
x = self.up2(x, x3)
x = self.up3(x, x2)
x = self.up4(x, x1)
logits = self.outc(x)
return logits
if __name__ == '__main__':
net = UNet(n_channels=3, n_classes=1)
print(net)
|
分析
1
2
3
4
5
6
7
8
9
10
| self.inc = DoubleConv(n_channels, 64)
self.down1 = Down(64, 128)
self.down2 = Down(128, 256)
self.down3 = Down(256, 512)
self.down4 = Down(512, 1024)
self.up1 = Up(1024, 512)
self.up2 = Up(512, 256)
self.up3 = Up(256, 128)
self.up4 = Up(128, 64)
self.outc = OutConv(64, n_classes)
|
假设输入数据为 256 * 256 * 3 的图片,所以,转化为 tensor 为 1 * 3 * 512 * 512
我们假设这是一个图片去噪的 unet ,所以,我们的输入还是输出的通道都是 3。
即
UNet(3,3)
self.inc = DoubleConv(n_channels, 64) # n_channels = 3
在这一步中在 DoubleConv 中,先是转化为 1 * 64 * 254 * 254 再次转化为 1 * 64 * 252 * 252
self.down1 = Down(64, 128)
先是最大池化变为 1 * 64 * 126 * 126 ,然后在 DoubleConv 先是转化为 1 * 128 * 124 * 124 再次转化为 1 * 128 * 122 * 122
self.down2 = Down(128, 256)
先是最大池化变为 1 * 256 * 61 * 61 ,然后在 DoubleConv 先是转化为 1 * 256 * 59 * 59 再次转化为 1 * 256 * 57 * 57
self.down3 = Down(256, 512)
先是最大池化变为 1 * 512 * 28 * 28 ,然后在 DoubleConv 先是转化为 1 * 512 * 26 * 26 再次转化为 1 * 512 * 24 * 24
第五步操作
self.down4 = Down(512, 1024)
先是最大池化变为 1 * 1024 * 12 * 12 ,然后在 DoubleConv 先是转化为 1 * 1024 * 10 * 10 再次转化为 1 * 1024 * 8 * 8
第六步操作
self.up1 = Up(1024, 512)
在 forward 中
x = self.up1(x5, x4)
这个对应的是使用左边的 x4 也就是 第四步操作 的值进行 concat
首先 x4 是 1 * 512 * 24 * 24
在这里 x5 是 1 * 1024 * 8 * 8 经过 反卷积放大后,通道缩放,变成 1 * 512 * 16 * 16 根据运算,将 x5 扩成 1 * 512 * 24 * 24
接着 x4 和 x5 进行 concat 变成 1 * 1024 * 24 * 24
接着再次进行一个 DoubleConv 第一步是将 1 * 1024 * 24 * 24