0%

tensorflow.js | poseNet

使用 tensorflow.js 做一个姿态迁移的预估。


参考资料


安装


原生使用

1
2
3
4
5
6
7
8
9
10
11
12
13
14
15
16
17
18
19
20
21
22
23
24
25
26
27
<html>
<head>
<!-- Load TensorFlow.js -->
<script src="https://cdn.jsdelivr.net/npm/@tensorflow/tfjs"></script>
<!-- Load Posenet -->
<script src="https://cdn.jsdelivr.net/npm/@tensorflow-models/posenet"></script>
</head>

<body>
<img id='cat' src='/images/cat.jpg '/>
</body>
<!-- Place your code in the script tag below. You can also use an external .js file -->
<script>
var flipHorizontal = false;

var imageElement = document.getElementById('cat');

posenet.load().then(function(net) {
const pose = net.estimateSinglePose(imageElement, {
flipHorizontal: true
});
return pose;
}).then(function(pose){
console.log(pose);
})
</script>
</html>

npm

在这里我们先要安装 tensorflow.js

但是,如果我们使用

npm install @tensorflow/tfjs

在现在我们安装的是 tfjs2+ 这个是不符合的,我们需要 1+tfjs 才适合。

npm install @tensorlfow/tfjs@1

我使用的是

"@tensorflow/tfjs": "~1.3.1"

然后安装

npm install @tensorflow-models/posenet

package.json 中,我的版本如下

1
2
3
4
"dependencies": {
"@tensorflow-models/posenet": "^2.2.1",
"@tensorflow/tfjs": "~1.3.1"
},

其代码如下:

1
2
3
4
5
6
7
8
9
10
11
12
13
14
15
import * as posenet from '@tensorflow-models/posenet';

const imageElement = document.getElementById('cat');

async function estimatePoseOnImage(imageElement) {
const net = await posenet.load();

const pose = await net.estimateSinglePose(imageElement, {
flipHorizontal: false
});
return pose;
}
estimatePoseOnImage(imageElement).then(function (pose) {
console.log(pose);
});

有趣的是,如果代码改成下面这样,试运行不了的,原因还不知道

1
2
3
4
5
6
7
8
9
10
11
12
13
14
15
import * as posenet from '@tensorflow-models/posenet';

const imageElement = document.getElementById('cat');

function estimatePoseOnImage(imageElement) {
const net = posenet.load();

const pose = net.estimateSinglePose(imageElement, {
flipHorizontal: false
});
return pose;
}
estimatePoseOnImage(imageElement).then(function (pose) {
console.log(pose);
});

所以,可以使用原生的代码进行线性运行。


参数详解


这个只针对 poseNet 2+ ,不是 poseNet 1+.

姿态估计分两个阶段进行:

  1. 将 RGB 图像作为输入馈送到卷积神经网络中。

  2. 利用单姿态或多姿态解码算法解码来解码模型输出中的姿态、姿态置信度得分、关键点位置和关键点置信度得分。

返回的事例如下图所示:

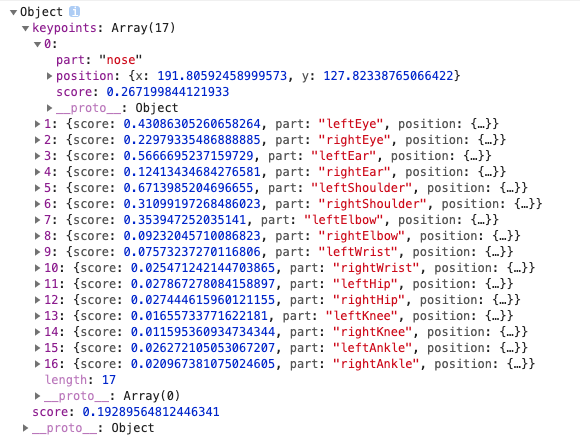
  • 姿态置信度得分——决定姿态估计的总体置信度,范围在 0.0~1.0 之间,可用来隐藏被认为不够明显的姿态。

  • 关键点——人体姿态被估计的一部分,如鼻子、右耳、左膝、右脚等。它包含位置和关键点置信度得分。
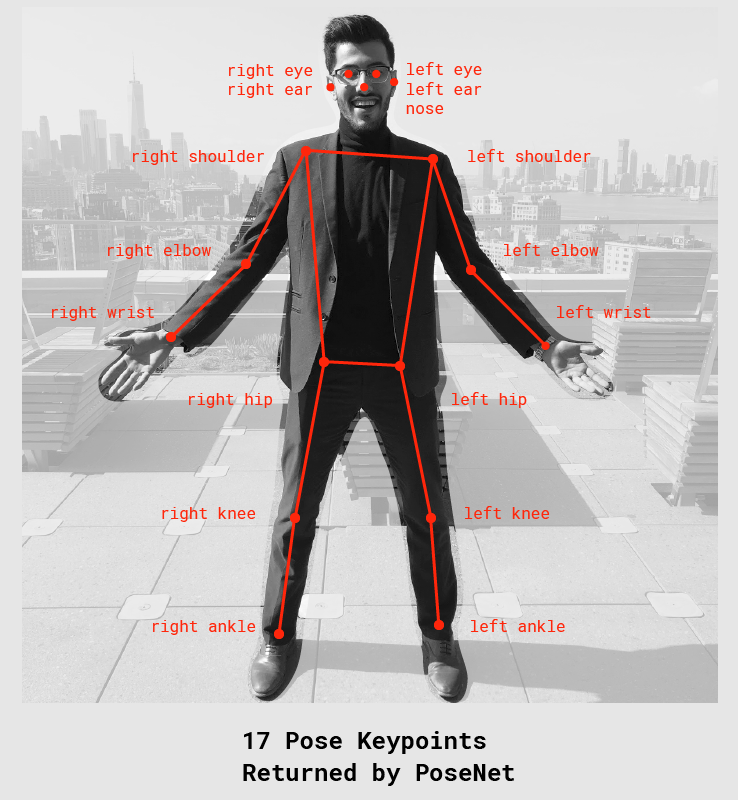
PoseNet 当前可以检测 17 个关键点:

    • 关键点置信度得分——决定估计的关键点位置准确的置信度,范围在 0.0~1.0 之间,可用来隐藏被认为不够明显的关键点。
    • 关键点位置——检测到的关键点在原始输入图像中的 2D xy 坐标。

模型加载

现阶段,模型一共有两个

  • MobileNetV1
  • ResNet50

加载模型

posenet.load()
  • architecture

    • 选择哪个模型
      • MobileNetV1
      • ResNet50
  • outputStride「输出步幅」

    • 8,16,32 其中一个
    • MobileNetV1 支持 8,16,32
    • ResNet50 支持 16,32
    • 步幅越低,准确率越高,速度越慢
  • inputResolution

    • 输入图像大小,默认是 257
    • 会将输入图片变成 inputResolution 大小。如果只提供一个数字,则图像会变成正方形。
    • 数值越大,越精确,速度越慢
  • multiplier

    • 1.01,1.0,0.75,0.50 中的一个
    • 该值只有 MobileNetV1 具有
    • 值越大,涂层越大,越精确,速度越慢
  • quantBytes「控制权重化字节」

    • 4,每个浮点数4个字节(无量化)。导致最高的准确性和原始模型的大小(〜90MB)。
    • 2,每个浮点数2个字节。导致精度略低,模型尺寸减少2倍(〜45MB)。
    • 1,每个浮点数1个字节。导致精度降低和模型尺寸减少4倍(〜22MB)。
  • modelUrl

    • 一个可选的字符串,用于指定模型的自定义网址。

默认的

posenet.load()

相当于

PoseNet loads a MobileNetV1 architecture with a 0.75 multiplier.

举几个例子:

1
2
3
4
5
6
const net = await posenet.load({
architecture: 'ResNet50',
outputStride: 32,
inputResolution: { width: 257, height: 200 },
quantBytes: 2
});

下面这个参数效果很好,建议使用

1
2
3
4
5
6
7
8
9
10
11
12
13
14
const defaultPoseNetArchitecture = 'MobileNetV1';
const defaultQuantBytes = 2;
const defaultMultiplier = 1.0;
const defaultStride = 16;
const defaultInputResolution = 200;

const pose_mode = posenet.load({
architecture: defaultPoseNetArchitecture,
outputStride: defaultStride,
inputResolution: defaultInputResolution,
multiplier: defaultMultiplier,
quantBytes: defaultQuantBytes
}
);

单人姿态预估

1
2
3
4
5
6
7
8
9
const net = await posenet.load();

let pose = await net.estimateSinglePose(video, {
flipHorizontal: false,
decodingMethod: 'multi-person',
maxDetections: 1,
scoreThreshold: minPartConfidence,
nmsRadius: nmsRadius,
});

参数如下「这些参数,我并没有在官方文档中找到,官方文档说的很模糊,我是看开源项目找到的,所以,下面参数不一定全」

  • video
    • ImageData|HTMLImageElement|HTMLCanvasElement|HTMLVideoElement The input image to feed through the network.
  • inferenceConfig
    • flipHorizontal
      • 默认为false。是否应水平翻转/镜像姿势。对于默认情况下将视频水平翻转的视频(即网络摄像头),并且您希望姿势以正确的方向返回,则应将其设置为true。
    • decodingMethod

    • imageScaleFactor
      • 取值0.2~1.0,默认为0.50。图像的缩放值。值越低,图像越小,传输速度越快。
    • outputStride
      • 取值32、16、8,默认为16。通过模型输入图像时输出的所需跨度。 取值越大,输出越快,准确度越低。
    • (以上参数同单人姿势估算)
    • maxPoseDetections(可选)
      • 默认为5,要检测的最大姿势数。
    • scoreThreshold(可选)
      • 默认为0.5,仅返回置信度大于或等于此值的实例。
    • nmsRadius(可选)
      • 默认为20。非极大值抑制,以像素为单位,这个值控制返回人物之间的最小距离。该值的增加或者减少是过滤不太精确的姿态的一种方式,但只是在调整姿态置信度值不够好的情况下。

多人姿态估计

略,等场景来了再说!

请我喝杯咖啡吧~