推荐你先看我之前的文章。
参考资料
如果我们想要进行get请求,那么使用少量的代码就能实现,如下所示:
1
2
3
4
5
6
7
8
9
10
11
12
13
14
15
16
17
OkHttpClient httpClient = new OkHttpClient(); String url = "https://www.baidu.com/" ; Request getRequest = new Request.Builder() .url(url) .get() .build(); Call call = httpClient.newCall(getRequest); call.enqueue(new Callback() { @Override public void onFailure (Call call, IOException e) } @Override public void onResponse (Call call, Response response) throws IOException } });
看起来很简洁的代码,实际是OkHttp在背后帮我们默默执行了成吨的工作。
知其然也要知其所以然。那么这篇我们就来解析一下OkHttp的源码,看看它在这些简单用法的背后,到底执行了多么复杂的工作。
请求的创建
以上面get请求的代码步骤分析,那么先分析OkHttpClient实例的创建。
在入门篇(一)中,提到OkHttpClient实例化可以直接创建,也可以使用Builder建造者模式进行配置然后build()即可。直接创建其实就是使用了默认的配置。其构造方法如下:
1
2
3
4
5
6
7
8
9
10
11
12
13
14
15
16
17
18
19
20
21
22
23
24
25
26
27
28
29
30
31
32
33
34
35
36
37
38
39
40
41
42
43
44
45
46
47
48
49
50
51
52
53
54
55
56
57
58
59
60
61
62
63
64
65
66
67
68
69
70
71
72
73
74
75
76
77
78
79
80
81
82
83
84
85
86
87
88
89
90
91
public OkHttpClient () this (new Builder()); } OkHttpClient(Builder builder) { this .dispatcher = builder.dispatcher; this .proxy = builder.proxy; this .protocols = builder.protocols; this .connectionSpecs = builder.connectionSpecs; this .interceptors = Util.immutableList(builder.interceptors); this .networkInterceptors = Util.immutableList(builder.networkInterceptors); this .eventListenerFactory = builder.eventListenerFactory; this .proxySelector = builder.proxySelector; this .cookieJar = builder.cookieJar; this .cache = builder.cache; this .internalCache = builder.internalCache; this .socketFactory = builder.socketFactory; boolean isTLS = false ; for (ConnectionSpec spec : connectionSpecs) { isTLS = isTLS || spec.isTls(); } if (builder.sslSocketFactory != null || !isTLS) { this .sslSocketFactory = builder.sslSocketFactory; this .certificateChainCleaner = builder.certificateChainCleaner; } else { X509TrustManager trustManager = Util.platformTrustManager(); this .sslSocketFactory = newSslSocketFactory(trustManager); this .certificateChainCleaner = CertificateChainCleaner.get(trustManager); } if (sslSocketFactory != null ) { Platform.get().configureSslSocketFactory(sslSocketFactory); } this .hostnameVerifier = builder.hostnameVerifier; this .certificatePinner = builder.certificatePinner.withCertificateChainCleaner( certificateChainCleaner); this .proxyAuthenticator = builder.proxyAuthenticator; this .authenticator = builder.authenticator; this .connectionPool = builder.connectionPool; this .dns = builder.dns; this .followSslRedirects = builder.followSslRedirects; this .followRedirects = builder.followRedirects; this .retryOnConnectionFailure = builder.retryOnConnectionFailure; this .callTimeout = builder.callTimeout; this .connectTimeout = builder.connectTimeout; this .readTimeout = builder.readTimeout; this .writeTimeout = builder.writeTimeout; this .pingInterval = builder.pingInterval; if (interceptors.contains(null )) { throw new IllegalStateException("Null interceptor: " + interceptors); } if (networkInterceptors.contains(null )) { throw new IllegalStateException("Null network interceptor: " + networkInterceptors); } } public static final class Builder ... public Builder () dispatcher = new Dispatcher(); protocols = DEFAULT_PROTOCOLS; connectionSpecs = DEFAULT_CONNECTION_SPECS; eventListenerFactory = EventListener.factory(EventListener.NONE); proxySelector = ProxySelector.getDefault(); if (proxySelector == null ) { proxySelector = new NullProxySelector(); } cookieJar = CookieJar.NO_COOKIES; socketFactory = SocketFactory.getDefault(); hostnameVerifier = OkHostnameVerifier.INSTANCE; certificatePinner = CertificatePinner.DEFAULT; proxyAuthenticator = Authenticator.NONE; authenticator = Authenticator.NONE; connectionPool = new ConnectionPool(); dns = Dns.SYSTEM; followSslRedirects = true ; followRedirects = true ; retryOnConnectionFailure = true ; callTimeout = 0 ; connectTimeout = 10_000 ; readTimeout = 10_000 ; writeTimeout = 10_000 ; pingInterval = 0 ; } ... }
直接创建OkHttpClient实例,配置项就是Builder构造方法中默认值。 可见配置项是非常多的,包括上一篇中已经使用过的超时设置、拦截器。
接着看Request的创建,也是使用建造者模式:
1
2
3
4
5
6
7
8
9
10
11
12
13
14
15
16
17
18
19
20
21
22
23
24
25
26
27
28
29
30
31
32
33
34
35
36
37
38
39
40
41
42
43
44
45
46
47
public Builder () this .method = "GET" ; this .headers = new Headers.Builder(); } public Builder get () return method("GET" , null ); } public Builder post (RequestBody body) return method("POST" , body); } public Builder method (String method, @Nullable RequestBody body) if (method == null ) throw new NullPointerException("method == null" ); if (method.length() == 0 ) throw new IllegalArgumentException("method.length() == 0" ); if (body != null && !HttpMethod.permitsRequestBody(method)) { throw new IllegalArgumentException("method " + method + " must not have a request body." ); } if (body == null && HttpMethod.requiresRequestBody(method)) { throw new IllegalArgumentException("method " + method + " must have a request body." ); } this .method = method; this .body = body; return this ; } public Builder addHeader (String name, String value) headers.add(name, value); return this ; } public Builder url (String url) if (url == null ) throw new NullPointerException("url == null" ); if (url.regionMatches(true , 0 , "ws:" , 0 , 3 )) { url = "http:" + url.substring(3 ); } else if (url.regionMatches(true , 0 , "wss:" , 0 , 4 )) { url = "https:" + url.substring(4 ); } return url(HttpUrl.get(url)); } public Request build () if (url == null ) throw new IllegalStateException("url == null" ); return new Request(this ); }
注意到get()和post(RequestBody body)都是对method方法的包装,method方法内部对请求方式和请求体进行了校验,比如get请求不能有请求体、post请求必须要请求体等。其他比较好理解,不再赘述。
接着看HttpClient的newCall方法:
1
2
3
@Override public Call newCall (Request request) return RealCall.newRealCall(this , request, false ); }
跟进RealCall的newRealCall方法:
1
2
3
4
5
6
static RealCall newRealCall (OkHttpClient client, Request originalRequest, boolean forWebSocket) RealCall call = new RealCall(client, originalRequest, forWebSocket); call.transmitter = new Transmitter(client, call); return call; }
可见HttpClient的newCall方法获得Call实际是RealCall。RealCall就是准备执行的请求,是对接口Call的实现。其内部持有OkHttpClient实例、Request实例。并且这里还创建了Transmitter给RealCall的transmitter赋值。
Transmitter意为发射器,是应用层和网络层的桥梁,在进行 连接、真正发出请求和读取响应中起到很重要的作用,看下构造方法:
1
2
3
4
5
6
7
public Transmitter (OkHttpClient client, Call call) this .client = client; this .connectionPool = Internal.instance.realConnectionPool(client.connectionPool()); this .call = call; this .eventListener = client.eventListenerFactory().create(call); this .timeout.timeout(client.callTimeoutMillis(), MILLISECONDS); }
Transmitter内部持有OkHttpClient、连接池、call、事件监听器。
再回头看RealCall实现的接口Call:
1 2 3 4 5 6 7 8 9 10 11 12 13 14 15 16 17 18 19 20 public interface Call extends Cloneable ... Response execute () throws IOException ; void enqueue (Callback responseCallback) void cancel () boolean isExecuted () boolean isCanceled () Timeout timeout () ; ... interface Factory Call newCall (Request request) ; } }
主要是定义请求的执行动作和状态。RealCall对Call的具体实现,在后面执行流程中说明。
好了,请求的创建就到这里了。
请求的调度
执行分为同步和异步,这里先从 同步请求 开始分析,即RealCall的execute方法:
1
2
3
4
5
6
7
8
9
10
11
12
13
14
@Override public Response execute () throws IOException synchronized (this ) { if (executed) throw new IllegalStateException("Already Executed" ); executed = true ; } transmitter.timeoutEnter(); transmitter.callStart(); try { client.dispatcher().executed(this ); return getResponseWithInterceptorChain(); } finally { client.dispatcher().finished(this ); } }
首先判断 如果已经执行,就会抛出异常。这就是一个请求只能执行一次的原因。然后回调请求监听器的请求开始。然后调用client的调度器Dispatcher的executed方法:
1
2
3
synchronized void executed (RealCall call) runningSyncCalls.add(call); }
很简单,请求放入一个双端队列runningSyncCalls中,表示正在执行的同步请求。
然后返回了getResponseWithInterceptorChain()的结果Response,可以猜到,同步请求真正的请求流程是在getResponseWithInterceptorChain方法中。
最后请求结束,会走Dispatcher的finished(Deque calls, T call)方法:
1 2 3 4 5 6 7 8 9 10 11 12 13 14 15 16 17 18 19 20 21 22 23 void finished (AsyncCall call) call.callsPerHost().decrementAndGet(); finished(runningAsyncCalls, call); } void finished (RealCall call) finished(runningSyncCalls, call); } private <T> void finished (Deque<T> calls, T call) ... synchronized (this ) { if (!calls.remove(call)) throw new AssertionError("Call wasn't in-flight!" ); idleCallback = this .idleCallback; } boolean isRunning = promoteAndExecute(); ... }
从队列中移除call,然后执行了 promoteAndExecute(),这里先不跟进去了后面会讲到。
到这里,我们知道了,同步请求走的是getResponseWithInterceptorChain()方法;
我们再来看 异步请求,即RealCall的enqueue方法:
1
2
3
4
5
6
7
8
public void enqueue (Callback responseCallback) synchronized (this ) { if (executed) throw new IllegalStateException("Already Executed" ); executed = true ; } transmitter.callStart(); client.dispatcher().enqueue(new AsyncCall(responseCallback)); }
同样先判断是否已请求过,回调请求开始。然后调用Dispatcher的enqueue方法,参数接受的是AsyncCall,AsyncCall继承NamedRunnable,NamedRunnable实现自Runnable,即AsyncCall就是个Runnable,可以想到它是会在线程或线程池执行run方法的。run方法在AsyncCall没看到啊,实际是在NamedRunnable中:
1 2 3 4 5 6 7 8 9 10 11 12 13 14 15 16 17 18 19 20 public abstract class NamedRunnable implements Runnable protected final String name; public NamedRunnable (String format, Object... args) this .name = Util.format(format, args); } public final void run () String oldName = Thread.currentThread().getName(); Thread.currentThread().setName(name); try { execute(); } finally { Thread.currentThread().setName(oldName); } } protected abstract void execute () }
run调用 抽象方法execute(),execute()在AsyncCall是有实现的,这里先不看。
我们继续去看Dispatcher的enqueue方法:
1
2
3
4
5
6
7
8
9
10
11
12
13
14
15
16
17
18
19
20
21
22
23
24
void enqueue (AsyncCall call) synchronized (this ) { readyAsyncCalls.add(call); if (!call.get().forWebSocket) { AsyncCall existingCall = findExistingCallWithHost(call.host()); if (existingCall != null ) call.reuseCallsPerHostFrom(existingCall); } } promoteAndExecute(); } private AsyncCall findExistingCallWithHost (String host) for (AsyncCall existingCall : runningAsyncCalls) { if (existingCall.host().equals(host)) return existingCall; } for (AsyncCall existingCall : readyAsyncCalls) { if (existingCall.host().equals(host)) return existingCall; } return null ; }
先把请求放入双端队列readyAsyncCalls中,表示等待执行的异步请求。为啥是等待执行呢?先留一个疑问。 接着从 正在执行的请求runningAsyncCalls 或 等待执行的请求readyAsyncCalls 中找到是相同host的请求,把callsPerHost重用给当前请求。callsPerHost看名字感觉像是 拥有相同host的请求的数量,并且注意到类型是AtomicInteger,声明如下:
1 private volatile AtomicInteger callsPerHost = new AtomicInteger(0 );
所以,相同host的请求是共享callsPerHost的,为了后面判断host并发做准备。
继续看,接着调用了promoteAndExecute(),前面看的finish方法也有调用,这里可以跟进看看了:
1 2 3 4 5 6 7 8 9 10 11 12 13 14 15 16 17 18 19 20 21 22 23 24 25 26 27 28 29 30 31 32 private boolean promoteAndExecute () assert (!Thread.holdsLock(this )); List<AsyncCall> executableCalls = new ArrayList<>(); boolean isRunning; synchronized (this ) { for (Iterator<AsyncCall> i = readyAsyncCalls.iterator(); i.hasNext(); ) { AsyncCall asyncCall = i.next(); if (runningAsyncCalls.size() >= maxRequests) break ; if (asyncCall.callsPerHost().get() >= maxRequestsPerHost) continue ; i.remove(); asyncCall.callsPerHost().incrementAndGet(); executableCalls.add(asyncCall); runningAsyncCalls.add(asyncCall); } isRunning = runningCallsCount() > 0 ; } for (int i = 0 , size = executableCalls.size(); i < size; i++) { AsyncCall asyncCall = executableCalls.get(i); asyncCall.executeOn(executorService()); } return isRunning; } public synchronized int runningCallsCount () return runningAsyncCalls.size() + runningSyncCalls.size(); }
遍历readyAsyncCalls,先进行两个检查:
正在执行的异步请求runningAsyncCalls数量大于最大并发请求数64就break,或者 相同host请求的数量大于5,就continue。
如果检查都通过,就从等待队列中移除,callsPerHost自增1,放入 可执行的集合executableCalls,并添加到队列runningAsyncCalls中,表示正在执行的异步请求。
这里就解释了 异步请求等待队列的意义了,就是为了控制最大并发数的缓冲:异步请求并发数达到64、相同host的异步请求达到5,都要放入等待队列。
遍历完后 把executableCalls中的请求都走executeOn方法:
1
2
3
4
5
6
7
8
9
10
11
12
13
14
15
16
17
18
19
20
21
22
23
24
25
void executeOn (ExecutorService executorService) assert (!Thread.holdsLock(client.dispatcher())); boolean success = false ; try { executorService.execute(this ); success = true ; } catch (RejectedExecutionException e) { ... transmitter.noMoreExchanges(ioException); responseCallback.onFailure(RealCall.this , ioException); } finally { if (!success) { client.dispatcher().finished(this ); } } } public synchronized ExecutorService executorService () if (executorService == null ) { executorService = new ThreadPoolExecutor(0 , Integer.MAX_VALUE, 60 , TimeUnit.SECONDS, new SynchronousQueue<>(), Util.threadFactory("OkHttp Dispatcher" , false )); } return executorService; }
executeOn方法很简单:使用类似CachedThreadPool的线程池 执行请求RealCall。如果执行失败,也会调用dispatcher的finished(Deque calls, T call)方法。
前面分析过,AsyncCall的run方法会走到execute()方法,来看下:
1
2
3
4
5
6
7
8
9
10
11
12
13
14
protected void execute () boolean signalledCallback = false ; transmitter.timeoutEnter(); try { Response response = getResponseWithInterceptorChain(); responseCallback.onResponse(RealCall.this , response); } catch (IOException e) { ... responseCallback.onFailure(RealCall.this , canceledException); ... } finally { client.dispatcher().finished(this ); } }
我们发现,这里和 同步请求 就很像了,同样是调用getResponseWithInterceptorChain()方法来获取结果Response,不同点是使用responseCallback把结果回调出去,最后请求结束也是调用了dispatcher的finish方法。
另外,前面说过,finish方法中也调用了promoteAndExecute()方法,说明 同步/异步 请求 结束后 也会重新调度当前的异步请求。
好了,到这里我们把 调度流程 梳理下:
发起 同步 请求后,RealCall使用Dispatcher存入runningSyncCalls,然后使用getResponseWithInterceptorChain()获取结果,最后调用Dispatcher的finish方法结束请求。
发起 异步 请求后,RealCall使用Dispatcher存入readyAsyncCalls,获得host并发数,使用promoteAndExecute()方法 在 控制异步并发 的策略基础上,使用 线程池 执行异步请求(并发控制有包括 最大并发数64、host最大并发数5)。异步请求的执行 也是使用getResponseWithInterceptorChain(),获得结果后回调出去。最后调用Dispatcher的finish方法结束请求。
Dispatcher:调度器,主要是异步请求的并发控制、把异步请求放入线程池执行,实现方法是promoteAndExecute()。 promoteAndExecute()有两处调用:添加异步请求时、同步/异步请求 结束时。
请求的执行
通过上面分析指导,无论同步还是异步请求,最终的执行都是在RealCall的getResponseWithInterceptorChain()方法,只不过异步请求 需要先通过Dispatcher进行并发控制和线程池处理。那么就来看看getResponseWithInterceptorChain():
1
2
3
4
5
6
7
8
9
10
11
12
13
14
15
16
17
18
19
20
21
22
23
24
25
26
27
28
29
30
31
32
33
Response getResponseWithInterceptorChain () throws IOException { List<Interceptor> interceptors = new ArrayList<>(); interceptors.addAll(client.interceptors()); interceptors.add(new RetryAndFollowUpInterceptor(client)); interceptors.add(new BridgeInterceptor(client.cookieJar())); interceptors.add(new CacheInterceptor(client.internalCache())); interceptors.add(new ConnectInterceptor(client)); if (!forWebSocket) { interceptors.addAll(client.networkInterceptors()); } interceptors.add(new CallServerInterceptor(forWebSocket)); Interceptor.Chain chain = new RealInterceptorChain(interceptors, transmitter, null , 0 , originalRequest, this , client.connectTimeoutMillis(), client.readTimeoutMillis(), client.writeTimeoutMillis()); boolean calledNoMoreExchanges = false ; try { Response response = chain.proceed(originalRequest); if (transmitter.isCanceled()) { closeQuietly(response); throw new IOException("Canceled" ); } return response; } catch (IOException e) { calledNoMoreExchanges = true ; throw transmitter.noMoreExchanges(e); } finally { if (!calledNoMoreExchanges) { transmitter.noMoreExchanges(null ); } } }
首先是把
应用拦截器(外部配置)client.interceptors()
重试跟进拦截器RetryAndFollowUpInterceptor
桥拦截器BridgeInterceptor
缓存拦截器CacheInterceptor
连接拦截器ConnectInterceptor
网络拦截器(外部配置)client.networkInterceptors()
请求服务拦截器CallServerInterceptor
依次 添加到集合interceptors中。然后使用interceptors、transmitter、originalRequest等创建了拦截器链RealInterceptorChain实例,最后用proceed方法获取到请求的结果Response。
在上一篇 使用方法中有提到拦截器Interceptor,那里配置的拦截器 实际就是 应用拦截器:client.interceptors(),是最早被添加到interceptors中。那么到底 拦截器是个啥呢?chain.proceed是如何获取到结果的呢?不着急,我们先看看Interceptor类:
1
2
3
4
5
6
7
8
9
10
11
12
13
14
15
16
17
18
19
20
21
22
23
24
25
26
27
28
29
30
31
s public interface Interceptor Response intercept (Chain chain) throws IOException ; interface Chain Request request () ; Response proceed (Request request) throws IOException ; @Nullable Connection connection () ; Call call () ; int connectTimeoutMillis () Chain withConnectTimeout (int timeout, TimeUnit unit) ; int readTimeoutMillis () Chain withReadTimeout (int timeout, TimeUnit unit) ; int writeTimeoutMillis () Chain withWriteTimeout (int timeout, TimeUnit unit) ; } }
Interceptor是个接口类,只有一个intercept方法,参数是Chain对象。再注意到 内部接口类Chain – 拦截器链,有个proceed方法,参数是Request对象,返回值是Response,那么这个方法的实现就是请求的处理过程了。Chain的唯一实现类就是RealInterceptorChain,负责把所有拦截器串联起来,proceed方法就是串联的操作。
上述一系列的拦截器都是Interceptor的实现类,这里先贴出上一篇中实现的应用拦截器(其他拦截器的实现暂不去跟进):
1
2
3
4
5
6
7
8
9
10
11
12
13
14
new Interceptor() { @Override public Response intercept (Chain chain) throws IOException Request request = chain.request(); String url = request.url().toString(); Log.i(TAG, "intercept: proceed start: url" + url+ ", at " +System.currentTimeMillis()); Response response = chain.proceed(request); ResponseBody body = response.body(); Log.i(TAG, "intercept: proceed end: url" + url+ ", at " +System.currentTimeMillis()); return response; } }
在intercept方法中我们调用chain.proceed方法获取了结果 并在前后打印了一些日志,那这个Chain实例是哪来的呢?intercept方法啥时候被调用的呢?— — 我们再回头看getResponseWithInterceptorChain方法,所有拦截器都被传入RealInterceptorChain,可以猜想到,必定是RealInterceptorChain的proceed方法内部调用了拦截器的intercept方法。 那么就来看看吧:
1
2
3
4
5
6
7
8
9
10
11
12
13
14
15
16
17
18
19
20
21
22
23
24
25
26
27
28
29
30
31
32
33
34
35
36
37
38
39
40
41
42
43
44
45
46
@Override public Response proceed (Request request) throws IOException return proceed(request, transmitter, exchange); } public Response proceed (Request request, Transmitter transmitter, @Nullable Exchange exchange) throws IOException { if (index >= interceptors.size()) throw new AssertionError(); calls++; if (this .exchange != null && !this .exchange.connection().supportsUrl(request.url())) { throw new IllegalStateException("network interceptor " + interceptors.get(index - 1 ) + " must retain the same host and port" ); } if (this .exchange != null && calls > 1 ) { throw new IllegalStateException("network interceptor " + interceptors.get(index - 1 ) + " must call proceed() exactly once" ); } RealInterceptorChain next = new RealInterceptorChain(interceptors, transmitter, exchange, index + 1 , request, call, connectTimeout, readTimeout, writeTimeout); Interceptor interceptor = interceptors.get(index); Response response = interceptor.intercept(next); if (exchange != null && index + 1 < interceptors.size() && next.calls != 1 ) { throw new IllegalStateException("network interceptor " + interceptor + " must call proceed() exactly once" ); } if (response == null ) { throw new NullPointerException("interceptor " + interceptor + " returned null" ); } if (response.body() == null ) { throw new IllegalStateException( "interceptor " + interceptor + " returned a response with no body" ); } return response; }
在实例化RealInterceptorChain时 index赋值是0,exchange是null,所以前面三个if都没走进去。然后获取了第一个拦截器,也就是我们配置的应用拦截器,调用了它的interceptor方法,并返回和校验了结果。这里证实了我们猜想。同时注意到,调用 应用拦截器的interceptor方法传入的参数:拦截器链实例next,next就是把index + 1而已,其他参数和当前实例是一样的。也就是说 在我们的应用拦截器中调用的是 next的proceed方法。
进一步,next的proceed方法中 同样会获取interceptors的index=1的拦截器,即RetryAndFollowUpInterceptor实例,然后调用其interceptor方法,参数是index+1即index=2的chain。跟进RetryAndFollowUpInterceptor的代码发现,interceptor方法内部也是有调用chain的proceed方法。这样就会依次传递下去,直到最后一个拦截器CallServerInterceptor。
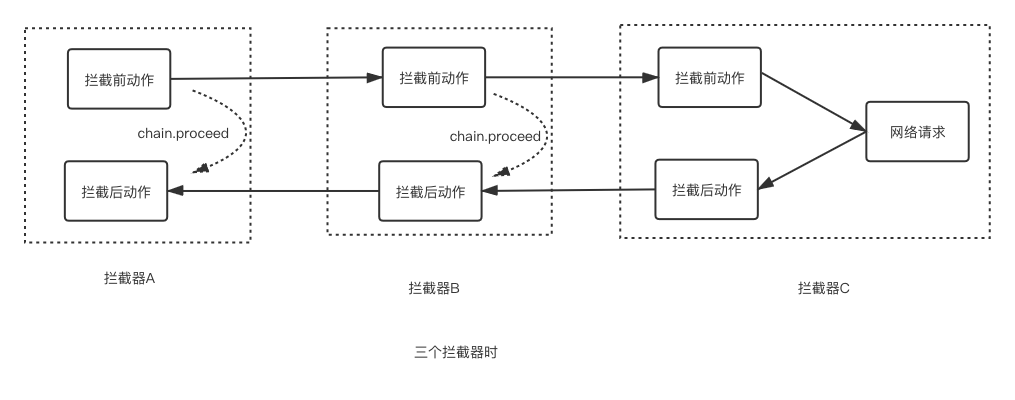
实际上 除了最后一个拦截器CallServerInterceptor之外,所有拦截器的interceptor方法都调用了 传入 chain的proceed方法。每个拦截器在chain的proceed方法 前后 处理了自己负责的工作。例如我们的应用拦截器,在chain的proceed方法前 打印了request信息的日志,chain的proceed方法获取结果 之后 打印了response信息的日志。每个拦截器interceptor方法在 调用chain的proceed方法时 都是为了获取下一个拦截器处理的response,然后返回给上一个拦截器。
逻辑总结如下图:
这就是 okhttp执行流程的核心了,整体流程如下:
现在来总结下:
拦截器链:把原始请求 request 依次 传入到 每个拦截器。拦截器 处理后 把response 反向 依次 回传。拦截器:可以对request进行处理,然后调用index+1的拦截器链proceed方法 获取下一个拦截器处理的结果,接着自己也可以处理这个结果,即: 处理request、chain.proceed、处理response。
不知你有没有发现,这一过程 和 公司工作生产流程 很像:
老板接到一笔订单,要求10天内生产100台电脑。
总经理拿到任务后,修改了任务和时间:8天内生产110台,这是基于 生产合格率 以及进行重工、检验、包装、运输的时间上的考量,既要保质保量,也要按时交货。
任务接着到了部门经理,部门经理先去确认了仓库中是否有足够存货,如果有就直接使用存货来交货,这样不存在任何交货风险(质量、时间);如果没有存货,那么就去要求生产线生产。
生产线按时按量生产完以后,会把生产情况 上报给部门经理,部门经理把结果总结成excel呈现给总经理,总经理则会把整个生产流程结果及各部门的配合情况,总结成PPT报告给老板。
而不同的拦截器,在网络请求这一任务中,就扮演着不同的角色。可能okhttp的作者写拦截器的灵感就来源于生活吧,哈哈。
拦截器
作用
应用拦截器
处理原始请求和最终的响应:可以添加自定义header、通用参数、参数加密、网关接入等等。
RetryAndFollowUpInterceptor
处理错误重试和重定向
BridgeInterceptor
应用层和网络层的桥接拦截器,主要工作是为请求添加cookie、添加固定的header,比如Host、Content-Length、Content-Type、User-Agent等等,然后保存响应结果的cookie,如果响应使用gzip压缩过,则还需要进行解压。
CacheInterceptor
缓存拦截器,获取缓存、更新缓存。如果命中缓存则不会发起网络请求。
ConnectInterceptor
连接拦截器,内部会维护一个连接池,负责连接复用、创建连接(三次握手等等)、释放连接以及创建连接上的socket流。
网络拦截器
用户自定义拦截器,通常用于监控网络层的数据传输。
CallServerInterceptor
请求拦截器,在前置准备工作完成后,真正发起网络请求,进行IO读写。
这里先大概知道每个拦截器的角色任务,下一篇将会详细分析每个拦截器,以及重要知识点–缓存和连接池。
那么,我们对okhttp执行流程的源码分析,到这里也结束了。