这是一个非常神奇的项目,其运行流程就是,拍摄一段视频,然后上传一个静态图片,静态图片会跟着视频的动作,做相同的动作,还是蛮神奇的。
比如,你可以让文物说话,兵马俑运动。
在国外有的人已经可以达到实时追踪了,感兴趣的同学可以去搜索。
项目相关
环境配置
我的集群系统是 ubuntu16.04 出于恐惧配置环境,所以,选择了该项目提供的 docker ,但是,由于国内对于一些资源封锁的很严重,所以,我们需要自己修改一些文件。
首先是
git clone https://github.com/AliaksandrSiarohin/first-order-model.git修改下面的文件
Dockerfile
1 | FROM nvcr.io/nvidia/cuda:10.0-cudnn7-runtime-ubuntu18.04 |
改成
1 | FROM nvcr.io/nvidia/cuda:10.0-cudnn7-runtime-ubuntu18.04 |
ps:之所以去掉那句话是因为我集群上拿不到这个资源,你可以根据自己实际情况进行修改。
然后修改
requirements.txt
1 | cffi==1.11.5 |
去掉
1 | torch==1.0.0 |
然后构建 docker 环境。
docker build -t first-order-model .其实只要一个 Dockerfile 文件就可以执行上面的构建命令了,但是,我最后还是直接
cd first-order-model
docker build -t first-order-model .
对了,你应该保证你的 docker 环境是
- Docker 19.03+
- nvidia-docker
我们经过还算漫长的等待时间,等全部构件完成后
docker images我们会发现出来一个新的镜像。
我们使用
docker run -it 镜像hash /bin/bash进入后,会进入 /app 这个目录内,接着我们要修改 requirements.txt 这个文件
添加上我们之前删除的那两个库
1 | torch==1.0.0 |
对了,由于这个 docker 没有 vi和 vim ,你需要使用 nano 来改变文件内容。
添加玩,保存后,运行
pip3 install -r requirements.txt -i https://pypi.tuna.tsinghua.edu.cn/simple会很顺利的安装成功。
配置 face-alignment
face-alignment 是一个人脸识别的库。
这个人脸识别主要是对下面的模型和参数起作用。
- config 里面的
- vox-* 系列
- chekcpoint 里面的
- vox-* 系列
如果,要进行人脸替换或者说人脸追踪,就需要这个库进行视频预处理。
first-order-model 主要是对人脸起作用,但是,我们拍摄的视频,可能很多地方涉及到了无用的信息,比如全身、腿等,借助 face-alignment 识别出人脸位置,然后裁剪出来。
并且,裁剪出来的视频大小是
- 256 * 256
下面我会具体的说明命令行的使用。
即,我们
cd first-order-model
git clone https://github.com/1adrianb/face-alignment
cd face-alignment
pip3 install -r requirements.txt -i https://pypi.tuna.tsinghua.edu.cn/simple
python3 setup.py install
安装应该会特别顺利。
至此,我们把环境全部搭建好了。
全部安装好之后,我们 commit 一个新的 image,假设其 hash 为 a29d
运行
在这里我们运行的是他们直接提供的模型参数。你可以在原项目中找到最原始的资源链接「谷歌云盘」。
但是,由于一些原因,国内很难获取这些资源,我就帮助大家先下载下来了,你们可以通过下面的百度云盘下载。
截止到现在一共有 8 个训练模型,分别对应不同的配置。
下面我列一下配置列表。
| config | checkpoint |
|---|---|
| bair-256.yaml | bair-cpk.pth.tar |
| fashion-256.yaml | fashion.pth.tar |
| mgif-256.yaml | mgif-cpk.pth.tar |
| nemo-256.yaml | nemo-cpk.pth.tar |
| taichi-256.yaml | taichi-cpk.pth.tar |
| taichi-adv-256.yaml | taichi-adv-cpk.pth.tar |
| vox-256.yaml | vox-cpk.pth.tar |
| vox-adv-256.yaml | vox-adv-cpk.pth.tar |
不同的训练模型,不同的配置对应于不同的场景。
如果你对配置感兴趣,可以查看 taichi-256.yaml 这个文件,里面描写了一些配置解释。
我初步将 first-order-model 分为几个场景
- 人脸追踪替换
- 行为追踪替换
- 物品追踪替换
- 动画生成替换
人脸追踪替换
由于,这次我只是想进行人脸文物活起来,所以选择了这个方向。
相应的配置是下面的。
| config | checkpoint |
|---|---|
| vox-256.yaml | vox-cpk.pth.tar |
| vox-adv-256.yaml | vox-adv-cpk.pth.tar |
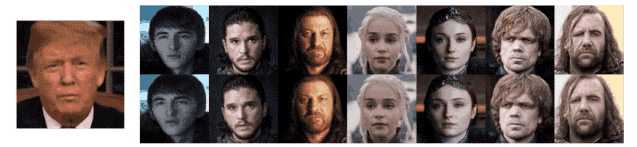
效果是这样的
我们假设项目路径是
/data/licong/first-order-model我们使用下面的命令,开启一个容器。
docker run -it --gpus all -v /data/licong/first-order-model:/app a29d需要注意的是,我们将 /data/licong/first-order-model 挂载到容器的 /app 中。
以后,无论在容器中对这个路径下的内容做什么操作,都会直接修改宿主机上的这个路径的内容。
也就是,我们无需使用 docker cp 来进行文件传输了。
预处理视频
为了更好的拟合,我们需要对视频进行处理。
假设,我们已经上传了视频,叫做 source.mp4。
那么,我们需要对其进行裁剪,运行下面的代码
python3 crop-video.py --inp source.mp4它会生成一个命令,我们运行那个命令完成裁剪。比如说生成出
1 | ffmpeg -i source.mp4 -ss 15.89655172413793 -t 79.62068965517241 -filter:v "crop=137:137:1045:355, scale=256:256" crop.mp4 |
我们只需要选择其中一个运行就可以了,然后会生成出一个 crop.mp4。我们用的就是这个 mp4 。
但是有的时候,我们运行了上面的预处理视频脚本,并没有命令生成,这个有可能和帧率有关,默认的最小帧率是 150。我们可以这样运行
python3 crop-video.py --inp source.mp4 --min_frames 30另外需要注意的是,虽然官方说可以处理图片或者 gif ,但是,经过验证确实不行,只能处理 mp4。
这个问题,官方也在 issue 中提出来了,不过,没有修改。。。可能是太懒了。
我自己写了一个处理图片的脚本。
其实远离很简单,上面的 crop 的目的就是找出人物头部,然后剪切成 256 * 256 大小的矩形。
所以,我写了一个简单的处理图片的。
1 | import cv2 |
因为没有调用脸部识别,所以,希望你自己截图的时候,要把人脸放在中间,最好,截图的长宽近似相等,否则会造成失真。
对了,图片格式一定是 png。
OK,我们现在把 图片 和 视频 都处理好了,下面就该运行他们了。
python3 demo.py --config config/vox-256.yaml --driving_video crop.mp4 --source_image s.png --checkpoint vox-cpk.pth.tar --result_video result.mp4 --relative --adapt_scale不出意外,会很快得到结果。
这个时候,你就会发现在
/data/licong/first-order-model下,出现了一个 result.mp4 的文件。
把它下下来,看看是否满足你的要求吧。
抽帧合成图片
因为,论文中需要画图,所以,我进行了抽帧画图。源代码如下
1 | # -*- coding:utf8 -*- |
效果如下:

当然,你需要自己根据实际情况修改代码,祝好运吧!!!
其他
经过大规模的尝试,fashion 和 mgif 效果都不是很好,遂放弃。
如果遇到内存泄漏相关的问题,可以在运行的命令后面加上
--cpu