微信小程序——实现登录功能
用户体系的建立
自建用户体系VS沿用微信用户体系 自建用户体系:邮箱、电话等标记用户
但是自建用户体系需要用户去填写相关的信息,编写复杂的交互逻辑
沿用微信的用户体系——openid
openid
长度为32字符串
是微信给每一个用户的唯一标识
用户模型与用户视图 用户模型
用户的唯一标识——openid
用户的基本信息
其中我们在 authorization 中有一个文件是 models.py ,这里面有我们设定的模型
1
2
3
4
5
6
7
8
9
from django.db import modelsclass User (models.Model) : open_id = models.CharField(max_length=32 , unique=True ) nickname = models.CharField(max_length=256 )
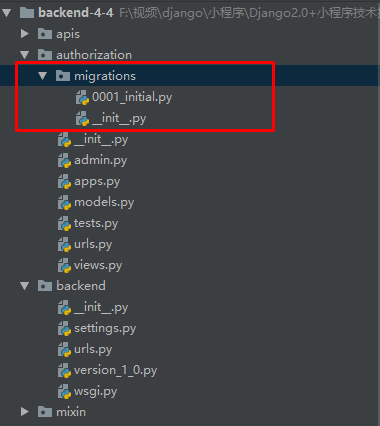
当我们完成这个模型后,我们需要进行数据库的迁移:
首先运行命令;
python manage.py makemigrations这个命令是 Django 会检查有没有模型变化,如果有模型变化,那么我们这个文件会记录这个模型变化。
然后,我们会发现多出来一个文件夹和文件:
然后,我们再次运行命令:
python manage.py migrate这个命令是对数据库的一个修改。
至此,完成了数据库的迁移。
获取用户的OpenID
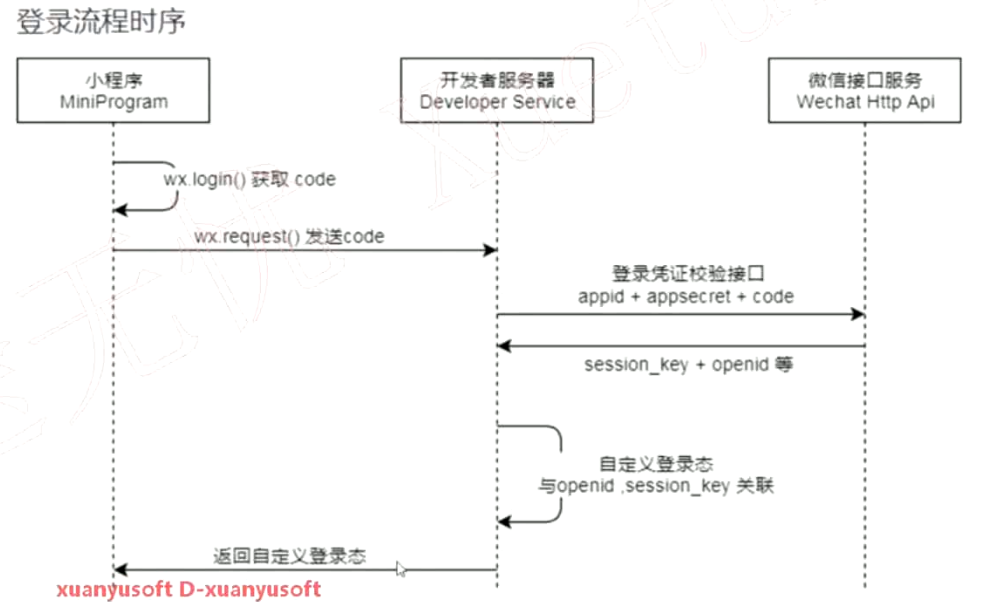
首先,小程序使用 wx.login() 获取临时的 code
然后,小程序使用 wx.request() 发送这个临时的 code 给开发者服务器,也就是Django后台。
Django后台将 appid + appsecret + code 发送到微信的接口服务,然后这个接口服务拿到这些信息后,校验合法后,将会给返回给开发者服务器 session_key + openid 等
开发者拿到这个 openid 后就可以用这个信息来标记不同的用户了
授权登录功能的实现
Django后台的目录架构:
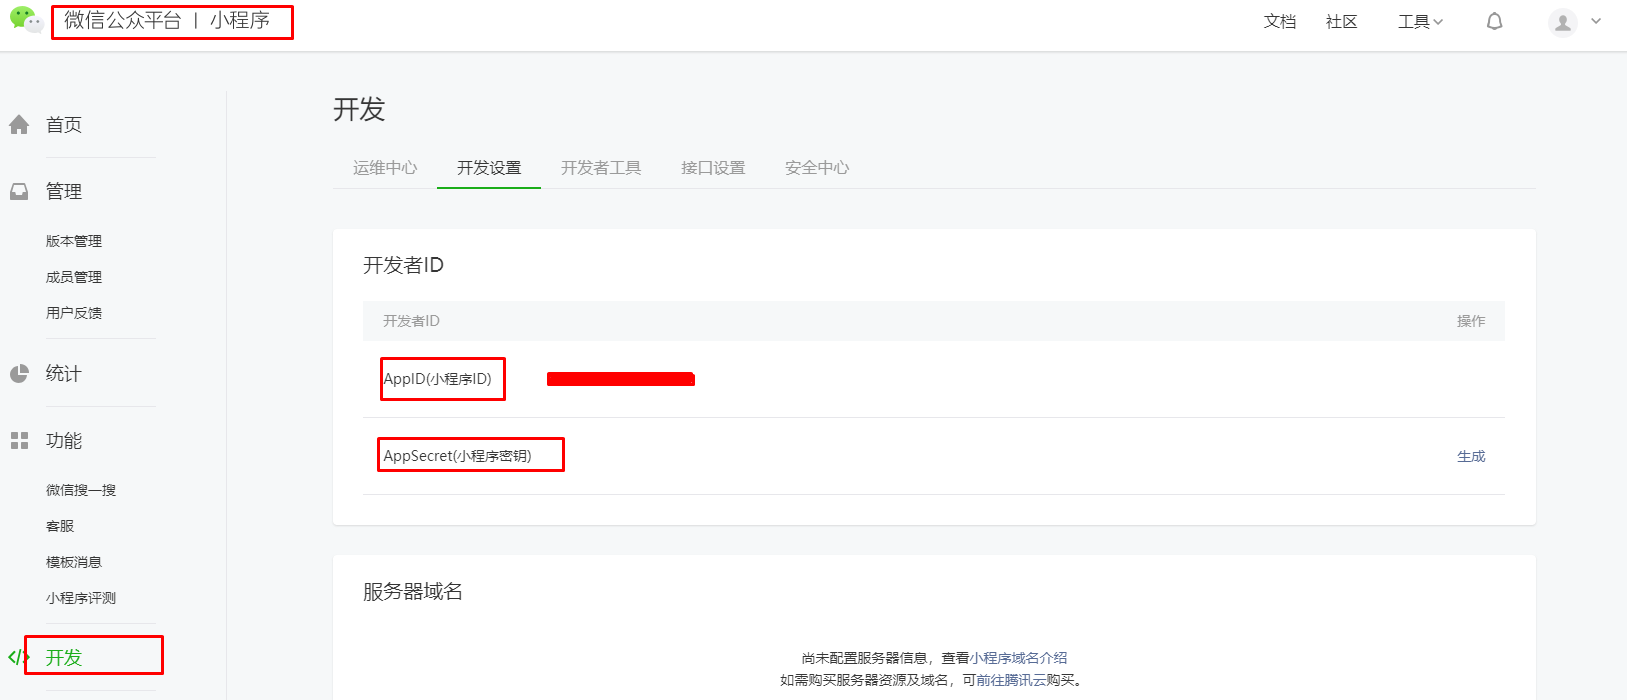
首先,我们先来了解一下什么是 appsecret,这个必须登录到微信小程序的开发界面。
我们获取后,将这个信息放到 backend 下的 settings.py 文件里面
STATIC_URL = '/static/'
RESOURCES_DIR = os.path.join(BASE_DIR, 'resources')
IMAGES_DIR = os.path.join(RESOURCES_DIR, 'images')
# app secret 由开发者在微信官网开发者页面生成的
WX_APP_SECRET = '896f8e82e259e6263c6d99323f426207'
然后,我们在 utils 文件夹下面有一个 auth.py ,这个的内容是:
1
2
3
4
5
6
7
8
9
10
11
12
13
14
15
16
17
18
19
20
21
22
23
24
25
26
27
28
29
30
31
32
33
34
35
36
37
38
39
40
41
42
43
44
45
46
47
48
import jsonimport requestsfrom utils import proxyimport backend.settingsfrom authorization.models import Userfrom utils.wx.crypt import WXBizDataCryptfrom utils.wx.code2session import code2sessiondef already_authorized (request) : is_authorized = False if request.session.get('is_authorized' ): is_authorized = True return is_authorized def get_user (request) : if not already_authorized(request): raise Exception('not authorized request' ) open_id = request.session.get('open_id' ) user = User.objects.get(open_id=open_id) return user def c2s (appid, code) : return code2session(appid, code) ''' return data 的格式 { "session_key": "JmRNs6uPEpFzlMRmg4NqJQ==", "expires_in": 7200, "openid": "oXSML0ZH05BItFTFILfgCGxXxxik" } ''' def code2session (appid, code) : API = 'https://api.weixin.qq.com/sns/jscode2session' params = 'appid=%s&secret=%s&js_code=%s&grant_type=authorization_code' % \ (appid, backend.settings.WX_APP_SECRET, code) url = API + '?' + params response = requests.get(url=url, proxies=proxy.proxy()) data = json.loads(response.text) print(data) return data
我们可以看到其中的 API 是微信的验证接口。
我们的Django的后台如下,其目录结构是 authorization 下的 views.py 内容如下:
1
2
3
4
5
6
7
8
9
10
11
12
13
14
15
16
17
18
19
20
21
22
23
24
25
26
27
28
29
30
31
32
33
34
35
36
37
38
39
40
41
42
43
44
45
46
47
48
49
50
51
52
53
54
55
56
57
58
59
60
61
import jsonfrom django.http import JsonResponsefrom django.views import Viewfrom utils.response import wrap_json_response, ReturnCode, CommonResponseMixinfrom utils.auth import already_authorized, c2sfrom .models import Userdef test_session (request) : request.session['message' ] = 'Test Django Session OK!' response = wrap_json_response(code=ReturnCode.SUCCESS) return JsonResponse(data=response, safe=False ) class UserView (View, CommonResponseMixin) : def get (self, request) : pass def post (self, request) : pass def __authorize_by_code (request) : ''' 使用wx.login的到的临时code到微信提供的code2session接口授权 ''' post_data = request.body.decode('utf-8' ) post_data = json.loads(post_data) code = post_data.get('code' ).strip() app_id = post_data.get('appId' ).strip() nickname = post_data.get('nickname' ).strip() response = {} if not code or not app_id: response['message' ] = 'authorized failed, need entire authorization data.' response['code ' ] = ReturnCode.BROKEN_AUTHORIZED_DATA return JsonResponse(data=response, safe=False ) data = c2s(app_id, code) openid = data.get('openid' ) print('get openid: ' , openid) if not openid: response = wrap_json_response(code=ReturnCode.FAILED, message='auth failed' ) return JsonResponse(data=response, safe=False ) request.session['open_id' ] = openid request.session['is_authorized' ] = True if not User.objects.filter(open_id=openid): new_user = User(open_id=openid, nickname=nickname) print('new user: open_id: %s, nickname: %s' % (openid, nickname) ) new_user.save() response = wrap_json_response(code=ReturnCode.SUCCESS, message='auth success.' ) return JsonResponse(data=response, safe=False ) pass def authorize (request) : return __authorize_by_code(request)
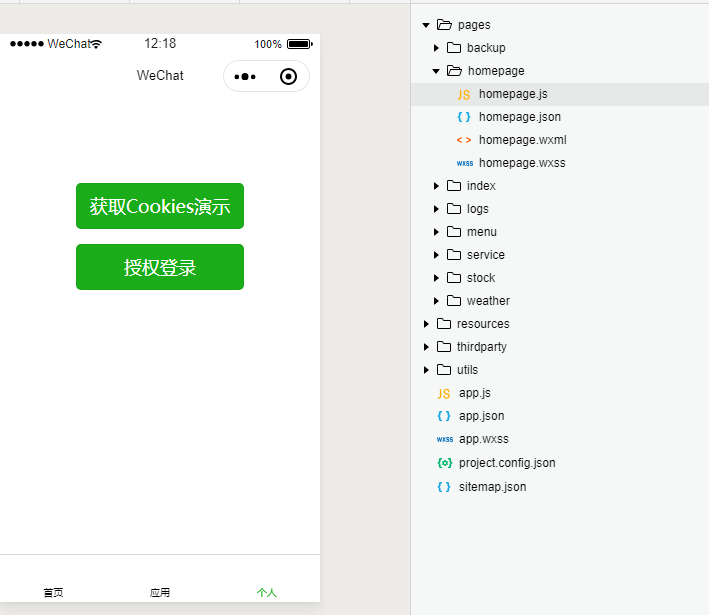
我们的小程序的界面是:
其中 homepage.wxml 的内容如下:
1
2
3
4
5
6
7
<!--pages/homepage/homepage.wxml--> <view class="container"> <view class="page__bd page__bd_spacing button-sp-area"> <button class="weui-btn mini-btn" type="primary" bindtap='onReadCookies'>获取Cookies演示</button> <button class="weui-btn mini-btn" type="primary" bindtap='authorize'>授权登录</button> </view> </view>
其中 homepage.js的 内容如下:
1
2
3
4
5
6
7
8
9
10
11
12
13
14
15
16
17
18
19
20
21
22
23
24
25
26
27
28
29
30
31
32
33
34
35
36
37
38
39
40
41
42
43
44
45
46
47
48
49
50
51
52
53
54
55
// pages/homepage/homepage.js const app = getApp() const cookieUtil = require('../../utils/cookie.js' ) Page({ /** * 页面的初始数据 */ data: { }, onReadCookies: function (){ wx.request({ url: app.globalData.serverUrl + app.globalData.apiVersion + '/auth/test' , success(res) { var cookie = cookieUtil.getSessionIDFromResponse(res) console.log(cookie) } } ) }, authorize: function () { wx.login({ success: function(res){ var code = res.code var appId = app.globalData.appId var nickname = app.globalData.userInfo.nickName wx.request({ url: app.globalData.serverUrl + app.globalData.apiVersion + '/auth/authorize' , method: 'POST' , data: { code: code, appId: appId, nickname: nickname }, header: { 'content-type' : 'application/json' }, success: function(res){ wx.showToast({ title: '授权成功' }) var cookie = cookieUtil.getSessionIDFromResponse(res) cookieUtil.setCookieToStorage(cookie) console.log(cookie) } }) } }) } })