微信小程序——综合实践之生活服务
实现天气应用
要修改的效果
函数视图改成类视图
weather page页面
下拉刷新页面
逻辑过程
由于代码的太多了,所以,我们这边只是说一下里面的逻辑过程。
这个在小程序内是 menu 页面。
其中,menu.wxml的代码为
1
2
3
4
5
6
7
8
9
10
11
12
13
14
15
16
<!--pages/menu/menu.wxml--> <view class="page"> <view class="page__hd"> <view class="weui-panel__hd">应用列表</view> </view> <view class="page__bd"> <view class="weui-grids"> <block wx:for ="{{grids}}" wx:key="*this" > <navigator url="" class="weui-grid" hover-class="weui-grid_active" data-index='{{index}}' bindtap='onNavigatorTap'> <image class="weui-grid__icon" src="../../resources/icons/cube.svg" /> <view class="weui-grid__label">{{item.app.name}}</view> </navigator> </block> </view> </view> </view>
这里面有一个标签是
<navigator url="" class="weui-grid" hover-class="weui-grid_active" data-index='{{index}}' bindtap='onNavigatorTap'>其中,data-index 是为了区分两个应用的参数,bindtap这个是点击之后执行的方法。
因为,我们有两个应用,所以,在点击之后,我们要让后台知道是哪个应用被点击了,所以,在这里,我们引入 data-index 参数。
在 menu.js 中,我们看到这样的代码:
1
2
3
4
5
6
7
8
9
10
11
12
13
14
15
16
17
18
19
20
21
22
23
24
25
26
27
28
29
30
31
32
33
34
35
36
37
38
39
40
41
42
43
44
45
46
47
48
49
50
51
52
53
54
55
56
// pages/menu/menu.js const app = getApp() Page({ /** * 页面的初始数据 */ data: { grids: [{ "name" : "应用1" }, { "name" : "应用2" }], // 九宫格内容 }, /** * 生命周期函数--监听页面加载 */ onLoad: function(options) { this.updateMenuData() }, /** * 请求后台,更新menu数据 */ updateMenuData: function() { var that = this wx.request({ url: app.globalData.serverUrl + app.globalData.apiVersion + '/service/menu' , success: function(res) { var menuData = res.data.data that.setData({ grids: menuData }) } }) }, onNavigatorTap: function(e) { var index = e.currentTarget.dataset.index var item = this.data.grids[index] console.log(item) if (item.app.application == 'weather' ) { console.log('-------------' ) wx.navigateTo({ url: '../weather/weather' , }) } else if (item.app.application == 'backup-image' ) { wx.navigateTo({ url: '../backup/backup' , }) } } })
在这里,我们将会重点剖析一些方法事例。
updateMenuData: function() {
    var that = this
    wx.request({
      url: app.globalData.serverUrl + app.globalData.apiVersion + '/service/menu',
      success: function(res) {
        var menuData = res.data.data
        that.setData({
          grids: menuData
        })
      }
    })
},
这个方法是获取应用数据,其请求路径是:
127.0.0.1:8000/api/v1.0/service/menu其中,在 menu.py 文件中,其代码是这样的
1
2
3
4
5
6
7
8
9
10
11
12
13
14
15
16
17
18
19
20
21
22
import osimport yamlfrom django.http import JsonResponsefrom backend import settingsimport utils.responsedef init_app_data () : data_file = os.path.join(settings.BASE_DIR, 'app.yaml' ) with open(data_file, 'r' , encoding='utf-8' ) as f: apps = yaml.load(f) return apps def get_menu (request) : global_app_data = init_app_data() published_apps = global_app_data['published' ] response = utils.response.wrap_json_response(data=published_apps) return JsonResponse(data=response, safe=False )
这个代码是让我们加载一个叫做 app.yaml 的文件,其内容是
1
2
3
4
5
6
7
8
9
10
11
12
13
14
15
16
published: - app: category: life application: weather name: 天气 publish_date: 2018 -10 -01 url: /service/weather desc: this is a weather app. - app: category: life application: backup-image name: 图片备份 publish_date: 2018 -10 -01 url: /service/image desc: this is a backup image app.
至此,我们就加载了应用信息。
onNavigatorTap onNavigatorTap: function(e) {
var index = e.currentTarget.dataset.index
var item = this.data.grids[index]
console.log(item)
if (item.app.application == 'weather') {
console.log('-------------')
wx.navigateTo({
url: '../weather/weather',
})
} else if (item.app.application == 'backup-image') {
wx.navigateTo({
url: '../backup/backup',
})
}
}这里重点讲一讲这个函数的细节。
var index = e.currentTarget.dataset.index这个方法就是获取具体是哪个应用。
参考下面的文章链接。
微信小程序 传值取值的几种方法总结
然后,利用上面的APP信息,我们得到具体点击的是哪个应用。
点击天气后,跳转到
由于天气的接口已经过期,所以这个页面显示是错误的,只能从视频上截图了,但是,视频又是AV画质。。。
其页面的 weather.wxml 的代码如下:
1
2
3
4
5
6
7
8
9
10
11
12
13
14
15
16
17
18
19
20
21
22
<!--pages/weather/weather.wxml--> <view class="weui-panel weui-panel_access"> <view wx:if='{{isAuthorized}}' class="weui-panel__hd">您关心的城市:</view> <view wx:else class="weui-panel__hd">当前热门城市:</view> <view class="weui-panel__bd"> <navigator url="" wx:for='{{weatherData}}' wx:key="*this" class="weui-media-box weui-media-box_appmsg" hover-class="weui-cell_active"> <view class="weui-media-box__hd weui-media-box__hd_in-appmsg"> <!-- 天气图表示例 --> <image class="weui-media-box__thumb" src="../../resources/icons/weather/sunny.svg" /> </view> <view class="weui-media-box__bd weui-media-box__bd_in-appmsg"> <view class="weui-media-box__title">{{item.city_info.province}}-{{item.city_info.city}}-{{item.city_info.area}}</view> <view class="weui-media-box__desc"> <text>温度:{{item.temperature}}度 风况:{{item.wind_direction}}{{wind_strength}}</text> </view> <view class="weui-media-box__desc"> <text>相对湿度:{{item.humidity}}</text> </view> </view> </navigator> </view> </view>
其 weather.js 的代码如下:
1
2
3
4
5
6
7
8
9
10
11
12
13
14
15
16
17
18
19
20
21
22
23
24
25
26
27
28
29
30
31
32
33
34
35
36
37
38
39
40
41
42
43
44
45
46
47
48
49
50
51
52
53
54
55
56
57
58
59
60
61
62
63
64
65
66
67
68
69
70
71
72
73
74
75
// pages/weather/weather.js const app = getApp() const popularCities = [{ "province" : "广东省" , "city" : "深圳市" , "area" : "南山区" }, { "province" : "广东省" , "city" : "广州市" , "area" : "天河区" }, { "province" : "北京市" , "city" : "北京市" , "area" : "朝阳区" }, { "province" : "上海市" , "city" : "上海市" , "area" : "徐汇区" } ] Page({ /** * 页面的初始数据 */ data: { isAuthorized: false, weatherData: null }, /** * 生命周期函数--监听页面加载 */ onLoad: function(options) { this.updateWeatherData() }, updateWeatherData: function() { wx.showLoading({ title: '加载中' , }) var that = this; wx.request({ url: app.globalData.serverUrl + app.globalData.apiVersion + '/service/weather' , method: 'POST' , header: { 'content-type' : 'application/json' // 默认值 }, data: { cities: popularCities }, success: function(res){ console.log(res.data.data) that.setData({ weatherData: res.data.data }) wx.hideLoading() } }) }, /** * 页面相关事件处理函数--监听用户下拉动作 */ onPullDownRefresh: function() { this.updateWeatherData() } })
在这里,我们要重点说两个:
下拉刷新 即,js中的
onPullDownRefresh想要,下拉起到效果,我们就得在 weather.json 中配置
enablePullDownRefresh这个选项默认是 false,最后 weather.js 的内容是:
{
  "navigationBarTitleText": "天气",
  "enablePullDownRefresh": true
}
updateWeatherData 请求后台数据 之所以用 POST 请求,是因为 GET 请求需要在 URL 中,自己带参数,还要解析参数,不如直接通过 POST 传数据。
将数据传到
127.0.0.1:8000/api/v1.0/service/weather这个 weather.py 的代码如下:
1
2
3
4
5
6
7
8
9
10
11
12
13
14
15
16
17
18
19
20
21
22
23
24
25
import jsonfrom django.views import Viewfrom django.http import HttpResponse, JsonResponsefrom utils.response import CommonResponseMixinfrom thirdparty import juheclass WeatherView (View, CommonResponseMixin) : def get (self, request) : pass def post (self, request) : data = [] received_body = request.body.decode('utf-8' ) received_body = json.loads(received_body) print(received_body) cities = received_body.get('cities' ) for city in cities: result = juhe.weather(city.get('city' )) result['city_info' ] = city data.append(result) response_data = self.wrap_json_response(data) return JsonResponse(data=response_data, safe=False )
其中
juhe.weather(city.get('city'))这个就是调用接口的,在这里就不再细说了。
另外,因为我们用的是类视图,所以,我们在 urls 设计上是这样的
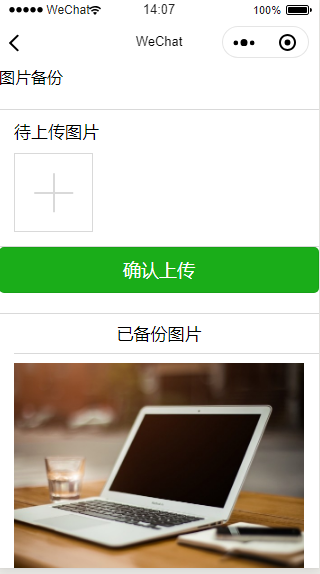
path('weather', weather.WeatherView.as_view()),优化图片备份应用
进入页面自动加载已备份的图片
长按删除和取消上传
上传成功自动更新小程序页面的已备份列表
这个页面在小程序叫做 backup
1
2
3
4
5
6
7
8
9
10
11
12
13
14
15
16
17
18
19
20
21
22
23
24
25
26
27
28
29
30
31
32
33
34
35
36
37
38
39
40
41
42
<view class="page"> <view class="page__hd"> <view class="page__title">图片备份</view> </view> <view class="page__bd"> <view class="weui-cells"> <view class="weui-cell"> <view class="weui-cell__bd"> <view class="weui-uploader"> <view class="weui-uploader__hd"> <view class="weui-uploader__title">待上传图片</view> </view> <view class="weui-uploader__bd"> <view class="weui-uploader__files" id="uploaderFiles"> <block wx:for ="{{needUploadFiles}}" wx:key="*this" > <view class="weui-uploader__file" data-type="UploadView" bind:longpress="longTapConfirm" data-id="{{item}}"> <image class="weui-uploader__img" src="{{item}}" mode="aspectFill" /> </view> </block> </view> <view class="weui-uploader__input-box"> <view class="weui-uploader__input" bindtap="chooseImage"></view> </view> </view> </view> </view> </view> </view> <view class="page__bd page__bd_spacing button-sp-area"> <button class="weui-btn mini-btn" type="primary" bindtap='uploadFiles'>确认上传</button> </view> <!-- 已上传图片 --> <view class="weui-cells"> <view class="text-center">已备份图片</view> <view class="weui-cell" wx:for="{{downloadedBackupedFiles}}"> <image class="" src="{{item.path}}" mode="aspectFill" data-index="{{index}}" data-type="DownloadedView" bindlongtap="longTapConfirm" /> </view> </view> <view class='text-center' wx:if="{{downloadedBackupedFiles.length == 0}}">暂无</view> </view> </view>
其 backup.js 的代码如下:
1
2
3
4
5
6
7
8
9
10
11
12
13
14
15
16
17
18
19
20
21
22
23
24
25
26
27
28
29
30
31
32
33
34
35
36
37
38
39
40
41
42
43
44
45
46
47
48
49
50
51
52
53
54
55
56
57
58
59
60
61
62
63
64
65
66
67
68
69
70
71
72
73
74
75
76
77
78
79
80
81
82
83
84
85
86
87
88
89
90
91
92
93
94
95
96
97
98
99
100
101
102
103
104
105
106
107
108
109
110
111
112
113
114
115
116
117
118
119
120
121
122
123
124
125
126
127
128
129
130
131
132
133
134
135
136
const app = getApp() const imageUrl = app.globalData.serverUrl + app.globalData.apiVersion + '/service/image' Page({ data: { // 需要上传的图片 needUploadFiles: [], // backupedFiles每个元素四个字段 name, md5, path, isDownloaded // 已下载的备份图片 downloadedBackupedFiles: [] }, // 选择图片上传 chooseImage: function(e) { var that = this; wx.chooseImage({ sizeType: ['original' , 'compressed' ], // 可以指定是原图还是压缩图,默认二者都有 sourceType: ['album' , 'camera' ], // 可以指定来源是相册还是相机,默认二者都有 success: function(res) { // 返回选定照片的本地文件路径列表,tempFilePath可以作为img标签的src属性显示图片 that.setData({ needUploadFiles: that.data.needUploadFiles.concat(res.tempFilePaths) }); } }) }, onLoad: function () { this.downloadAllFromRemote() }, // 下载所有的已备份图片 downloadAllFromRemote: function () { var that = this wx.request({ url: app.globalData.serverUrl + app.globalData.apiVersion + '/service/image/list' , method: 'GET' , success: function(res){ var imageList = res.data.data for (var i = 0 ; i < imageList.length; i ++){ var imageItem = imageList[i] that.downloadFile(imageItem) } } }) }, // 长按确认函数 longTapConfirm: function(e) { var that = this var confirmList = ["删除备份" ] wx.showActionSheet({ itemList: confirmList, success: function(res){ if (res.cancel){ return } var imageIndex = e.currentTarget.dataset.index var imageItem = that.data.downloadedBackupedFiles[imageIndex] var newList = that.data.downloadedBackupedFiles newList.splice(imageIndex, 1 ) that.setData({ downloadedBackupedFiles: newList }) that.deleteBackup(imageItem) } }) }, // 上传图片文件 uploadFiles: function() { var that = this that.setData({ newBackupedFiles: [] }) for (var i = 0 ; i < this.data.needUploadFiles.length; i++) { var file = this.data.needUploadFiles[i] wx.uploadFile({ url: app.globalData.serverUrl + app.globalData.apiVersion + '/service/image' , filePath: file, name: 'test' , success: function(res) { var res = JSON.parse(res.data) var md5 = res.data[0 ].md5 var name = res.data[0 ].name var newImageItem = { "md5" : md5, "name" : name } that.downloadFile(newImageItem) } }) } wx.showToast({ title: '上传成功' , }) this.setData({ needUploadFiles: [] }) }, // 下载图片 downloadFile: function (imgItem) { var that = this var downloadUrl = imageUrl + '?md5=' + imgItem.md5 wx.downloadFile({ url: downloadUrl, success: function (res) { var filepath = res.tempFilePath console.log(filepath) var newDownloadedBackupedFiles = that.data.downloadedBackupedFiles imgItem.path = filepath newDownloadedBackupedFiles.unshift(imgItem) that.setData({ downloadedBackupedFiles: newDownloadedBackupedFiles }) console.log(newDownloadedBackupedFiles) } }) }, // 删除图片 deleteBackup: function(imgItem){ console.log('delete a backup file.' + imgItem) wx.request({ url: imageUrl + '?md5=' + imgItem.md5, method: 'DELETE' , success: function(res){ console.log(res) wx.showToast({ title: '删除成功' , }) } }) }, });
onLoad 我们加载这个页面的时候,会自动加载已经上传的图片。
所以,我们写了这个方法
onLoad: function () {
    this.downloadAllFromRemote()
},
其中的关键性代码为
// 下载所有的已备份图片
downloadAllFromRemote: function () {
    var that = this
    wx.request({
    url: app.globalData.serverUrl + app.globalData.apiVersion + '/service/image/list',
    method: 'GET',
    success: function(res){
        var imageList = res.data.data
        for(var i = 0; i < imageList.length; i ++){
        var imageItem = imageList[i]
        that.downloadFile(imageItem)
        }
    }
    })
},
我们访问
127.0.0.1:8000/api/v1.0/service/image/list而相关的 py 文件代码如下:
1
2
3
4
5
6
7
8
9
10
11
12
13
14
15
16
17
18
19
20
21
22
23
24
25
26
27
28
29
30
31
32
33
34
35
36
37
38
39
40
41
42
43
44
45
46
47
48
49
50
51
52
53
54
55
56
57
58
59
60
61
62
63
64
65
66
67
import osimport hashlibfrom django.views import Viewfrom django.http import Http404, HttpResponse, FileResponse, JsonResponsefrom backend import settingsfrom utils.response import ReturnCode, CommonResponseMixinclass ImageListView (View, CommonResponseMixin) : def get (self, request) : image_files = os.listdir(settings.IMAGES_DIR) response_data = [] for image_file in image_files: response_data.append( { "name" : image_file, "md5" : image_file[:-4 ] } ) response_data = self.wrap_json_response(data=response_data) return JsonResponse(data=response_data) pass class ImageView (View, CommonResponseMixin) : def get (self, request) : md5 = request.GET.get('md5' ) imgfile = os.path.join(settings.IMAGES_DIR, md5 + '.jpg' ) print(imgfile) if os.path.exists(imgfile): data = open(imgfile, 'rb' ).read() return FileResponse(open(imgfile, 'rb' ), content_type='image/jpg' ) else : response = self.wrap_json_response(code=ReturnCode.RESOURCE_NOT_FOUND) return JsonResponse(data=response, safe=False ) def post (self, request) : files = request.FILES response_data = [] for key, uploaded_file in files.items(): print(key) print(uploaded_file) content = uploaded_file.read() md5 = hashlib.md5(content).hexdigest() path = os.path.join(settings.IMAGES_DIR, md5 + '.jpg' ) print(md5) with open(path, 'wb+' ) as f: f.write(content) response_data.append({ 'name' : key, 'md5' : md5 }) response = self.wrap_json_response(data=response_data, code=ReturnCode.SUCCESS) return JsonResponse(data=response, safe=False ) def delete (self, request) : md5 = request.GET.get('md5' ) img_name = md5 + '.jpg' path = os.path.join(settings.IMAGES_DIR, img_name) if os.path.exists(path): os.remove(path) message = 'remove success.' else : message = 'file(%s) not found.' % img_name response = self.wrap_json_response(code=ReturnCode.SUCCESS, message=message) return JsonResponse(data=response, safe=False )
在 url 中,我们这样配置
path('image', image.ImageView.as_view()),
path('image/list', image.ImageListView.as_view())
所以,上面我们调用的是
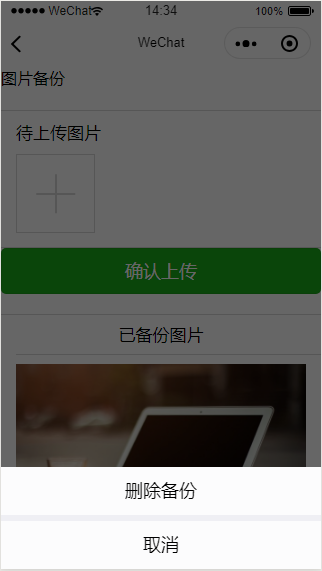
ImageListView这个方法长按删除
<view class="weui-uploader__file" data-type="UploadView" bind:longpress="longTapConfirm" data-id="{{item}}">
    <image class="weui-uploader__img" src="{{item}}" mode="aspectFill" />
</view>
我们这个对应的方法是
// 长按确认函数
longTapConfirm: function(e) {
    var that = this
    var confirmList = ["删除备份"]
    wx.showActionSheet({
        itemList: confirmList,
        success: function(res){
            if(res.cancel){
              return
            }
            var imageIndex = e.currentTarget.dataset.index
            var imageItem = that.data.downloadedBackupedFiles[imageIndex]
            var newList = that.data.downloadedBackupedFiles
            newList.splice(imageIndex, 1)
            that.setData({
                downloadedBackupedFiles: newList
            })
            that.deleteBackup(imageItem)
        }
    })
},
这一段是本地图片的删除
var imageIndex = e.currentTarget.dataset.index
var imageItem = that.data.downloadedBackupedFiles[imageIndex]
var newList = that.data.downloadedBackupedFiles
newList.splice(imageIndex, 1)
that.setData({
    downloadedBackupedFiles: newList
})
这个是远端图片的删除
that.deleteBackup(imageItem)上传图片后直接显示在界面上 // 上传图片文件
uploadFiles: function() {
var that = this
that.setData({
newBackupedFiles: []
})
for (var i = 0; i < this.data.needUploadFiles.length; i++) {
var file = this.data.needUploadFiles[i]
wx.uploadFile({
url: app.globalData.serverUrl + app.globalData.apiVersion + '/service/image',
filePath: file,
name: 'test',
success: function(res) {
var res = JSON.parse(res.data)
var md5 = res.data[0].md5
var name = res.data[0].name
var newImageItem = {
"md5": md5,
"name": name
}
that.downloadFile(newImageItem)
}
})
}
wx.showToast({
title: '上传成功',
})
this.setData({
needUploadFiles: []
})
},至此,所有的页面都已经设计完成。