这里介绍django的模板系统。
为什么要有模板
视图文件不适合编码 HTML
页面设就改变需要修改python 代码
网页逻辑和视图应该分开设计
是什么
模板系统的表现形式是文本
分离文档的表现形式和表现内容
模板系统定义了特有的标签占位符
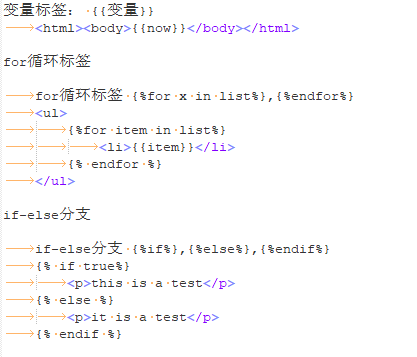
基本语法
这些语法和markdown语法冲突,所以,很多细节,不能看,建议直接看我的代码。
模板系统的渲染
定义页面,首先添加页面模板,也就是在 blog 中添加一个 templates 文件夹
templates用来放置模板文件
1、templates 该目录本身没有,如果我们需要使用,需要我们自己创建,该目录名通常为templates
2、创建位置:
    1、直接在应用下创建该目录,应用下的html模板,能直接在应用下的views中使用,一般也只给自己的应用使用
    2、直接在项目下创建该目录,在项目下创建的目录,所有的应用中的views都可以方便的使用
    3、如果是项目下的templates目录,需要配置才可以使用
    配置:1、在setting的TEMPLATES中配置
    如:'DIRS':[os.path.join(BASE_DIR,'templates')],
        2、项目不能识别templates为模板目录,需要将该目录标记成模板目录才可以使用
    标记:templates目录右键--mark Directory  as---template Folder
然后我们在 templates 下定义一个 blog 文件夹,用来放置 html
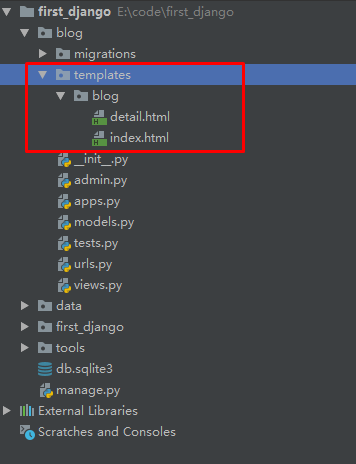
上面图中的data、tools文件夹不需要管,那是为了给数据库传递数据
我们先配置路由,也就是 blog下的urls.py文件
1
2
3
4
5
6
7
8
9
| from django.urls import path,include
import blog.views
urlpatterns = [
path('hello_world',blog.views.helloworld),
path('content',blog.views.article_content),
path('index',blog.views.get_index_page),
path('detail',blog.views.get_detail_page)
]
|
然后我们配置 blog 下的 views.py 文件
添加两个函数
1
2
3
4
5
6
7
8
9
10
11
12
13
14
|
def get_index_page(request):
    all_article = Article.objects.all()
    return render(request,'blog/index.html',
                  {
                    'article_list':all_article
                    })

def get_detail_page(request):
    curr_article = Article.objects.all()[0]
    return render(request,'blog/detail.html',
                  {
                      'curr_article':curr_article
                  })
|
最后我们编写index.html 文件
1
2
3
4
5
6
7
8
9
10
11
12
13
14
15
16
17
18
19
20
21
22
23
24
25
26
27
28
29
30
31
32
33
34
35
36
37
38
39
40
| <!DOCTYPE html>
<html lang="en">
<head>
<meta charset="UTF-8">
<title>这是一个测试</title>
<!-- 最新版本的 Bootstrap 核心 CSS 文件 -->
<link rel="stylesheet" href="https://cdn.jsdelivr.net/npm/bootstrap@3.3.7/dist/css/bootstrap.min.css" integrity="sha384-BVYiiSIFeK1dGmJRAkycuHAHRg32OmUcww7on3RYdg4Va+PmSTsz/K68vbdEjh4u" crossorigin="anonymous">
<!-- 最新的 Bootstrap 核心 JavaScript 文件 -->
<script src="https://cdn.jsdelivr.net/npm/bootstrap@3.3.7/dist/js/bootstrap.min.js" integrity="sha384-Tc5IQib027qvyjSMfHjOMaLkfuWVxZxUPnCJA7l2mCWNIpG9mGCD8wGNIcPD7Txa" crossorigin="anonymous"></script>
</head>
<body>
<div class="container page-header">
<h1>三小时入门django
<small>licong</small>
</h1>
</div>
<div class="container panel-body">
<div class="col-md-9" role="main">
<div class="body-main">
{% for article in article_list %}
<div>
<h2>{{ article.title}}</h2>
<p>
{{ article.brief_content }}
</p>
</div>
{% endfor %}
</div>
</div>
<div class="col-md-3" role="complementary">
<div>
<h2>最新文章</h2>
{% for article in article_list %}
<h4><a href="#">{{ article.title }}</a></h4>
{% endfor %}
</div>
</div>
</div>
</body>
</html>
|
最后运行项目,然后浏览器输入
http://127.0.0.1:8000/blog/index
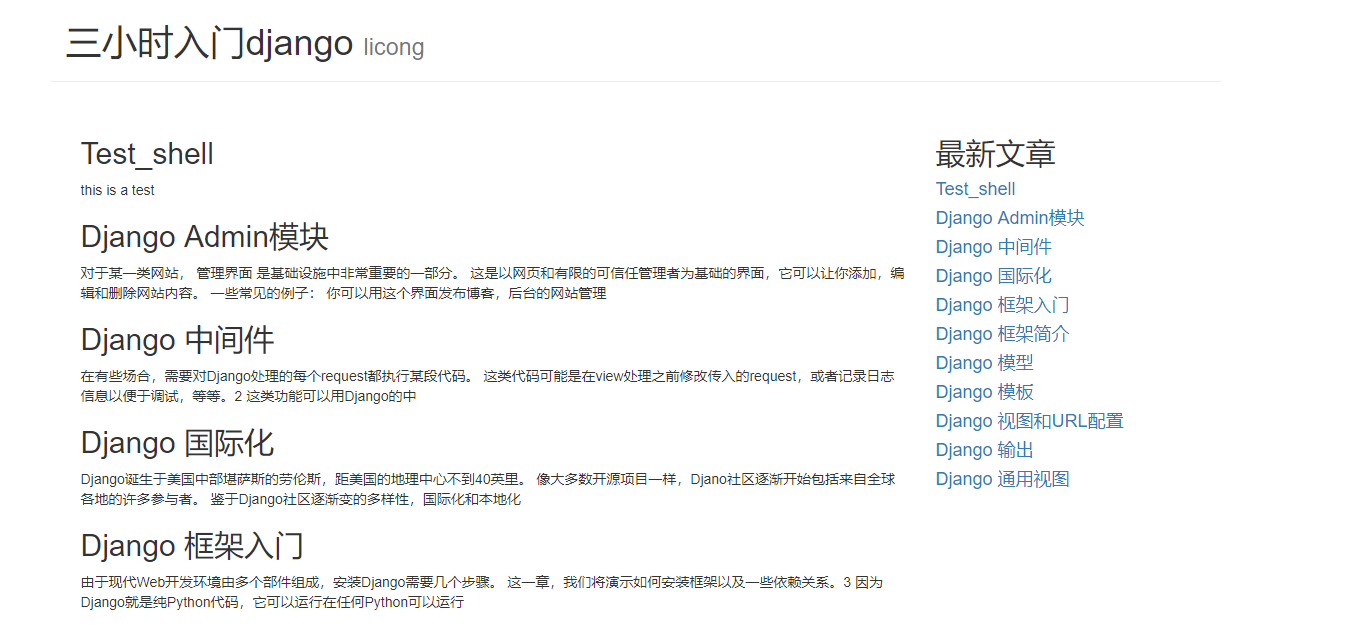
展现具体文章内容
之前是 /blog/detail 这个不能指定某一篇博客
所以我们要利用唯一ID使得url变成 /blog/detail/1 这种形式
首先修改 blog 下的路径文件
1
2
3
4
5
6
7
8
9
10
| from django.urls import path,include
import blog.views
urlpatterns = [
path('hello_world',blog.views.helloworld),
path('content',blog.views.article_content),
path('index',blog.views.get_index_page),
path('detail/<int:article_id>',blog.views.get_detail_page)
]
|
之前的blog下面的views.py
1
2
3
4
5
6
7
|
def get_detail_page(request):
    curr_article = Article.objects.all()[0]
    return render(request,'blog/detail.html',
                  {
                      'curr_article':curr_article
                  })
|
变成
1
2
3
4
5
6
7
8
9
10
11
12
| def get_detail_page(request,article_id):
all_article = Article.objects.all()
curr_article = None
for article in all_article:
if article.article_id == article_id:
curr_article = article
break
return render(request,'blog/detail.html',
{
'curr_article':curr_article
})
|
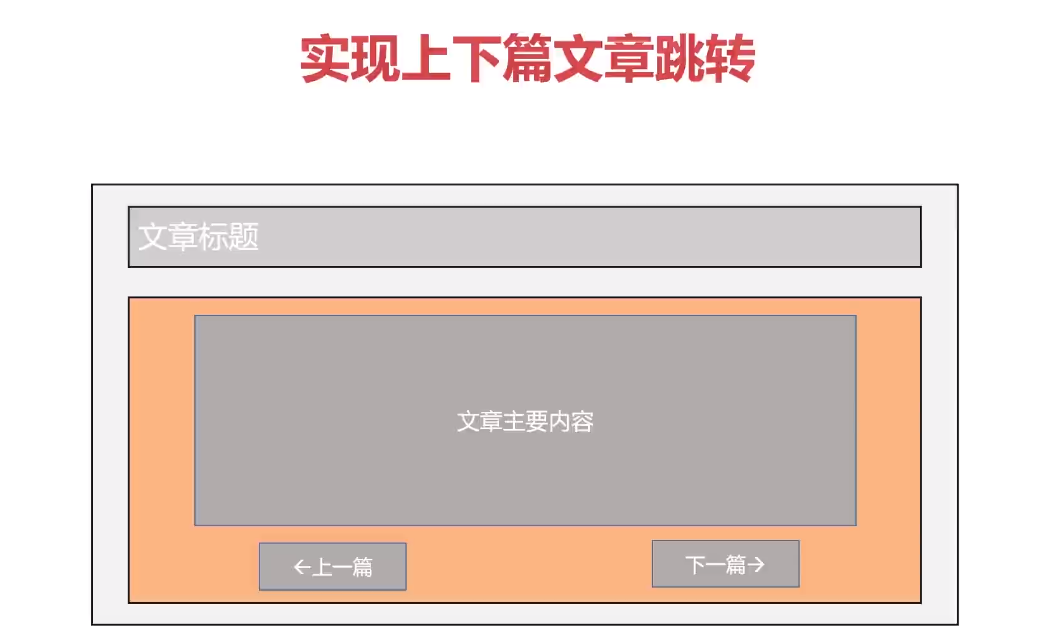
实现上一篇,下一篇的按钮效果
修改blog 下面的 views 的 get_detail_page 函数
1
2
3
4
5
6
7
8
9
10
11
12
13
14
15
16
17
18
19
20
21
22
23
24
25
26
27
28
29
30
31
32
| def get_detail_page(request,article_id):
all_article = Article.objects.all()
curr_article = None
previous_index = 0
next_index = 0
previous_article = None
next_article = None
for index,article in enumerate(all_article):
if index == 0:
previous_index = 0
next_index = index + 1
elif index == len(all_article) - 1:
previous_index = index
next_index = index
else:
previous_index = index - 1
next_index = index + 1
if article.article_id == article_id:
curr_article = article
previous_article = all_article[previous_index]
next_article = all_article[next_index]
break
return render(request,'blog/detail.html',
{
'curr_article':curr_article,
'previous_article':previous_article,
'next_article':next_article
})
|
然后修改detail的代码
1
2
3
4
5
6
7
8
9
10
11
12
13
14
15
16
17
18
19
20
21
22
23
24
25
26
27
28
29
30
| <!DOCTYPE html>
<html lang="en">
<head>
<meta charset="UTF-8">
<title>这是一个测试</title>
<!-- 最新版本的 Bootstrap 核心 CSS 文件 -->
<link rel="stylesheet" href="https://cdn.jsdelivr.net/npm/bootstrap@3.3.7/dist/css/bootstrap.min.css" integrity="sha384-BVYiiSIFeK1dGmJRAkycuHAHRg32OmUcww7on3RYdg4Va+PmSTsz/K68vbdEjh4u" crossorigin="anonymous">
<!-- 最新的 Bootstrap 核心 JavaScript 文件 -->
<script src="https://cdn.jsdelivr.net/npm/bootstrap@3.3.7/dist/js/bootstrap.min.js" integrity="sha384-Tc5IQib027qvyjSMfHjOMaLkfuWVxZxUPnCJA7l2mCWNIpG9mGCD8wGNIcPD7Txa" crossorigin="anonymous"></script>
</head>
<body>
<div class="container page-header">
<h1>{{ curr_article.title }}
</h1>
</div>
<div class="container panel-body">
<div>
<p>{{ curr_article.content }}</p>
</div>
</div>
<div>
<nav aria-label="...">
<ul class="pager">
<li><a href="/blog/detail/{{ previous_article.article_id }}">上一页 {{ previous_article.title }}</a></li>
<li><a href="/blog/detail/{{ next_article.article_id }}">下一页 {{ next_article.title }}</a></li>
</ul>
</nav>
</div>
</body>
</html>
|
最后的页面如下面所示: