0%

多个 ADS1115 和树莓派连接

因为单个 ADS1115 只有四个输入通道,当遇到多个输入通道的时候,我们要进行相应的扩展,也就是将多个 ADS1115 连在一起。

参考资料

adafruit/Adafruit_Python_ADS1x15
Multiple ADS1115 on a Raspberry Pi Model A+
ADS1115数据手册中文翻译
I2C总线协议中文版PDF
adafruit-4-channel-adc-breakouts
IIC知识整理以及ADS1115

环境配置

树莓派 zero W
系统:带有图形化界面

过程

首先,我们要知道,ADS1115 最多可以并联 4 个 ADS1115 。其,并联方式如下图:

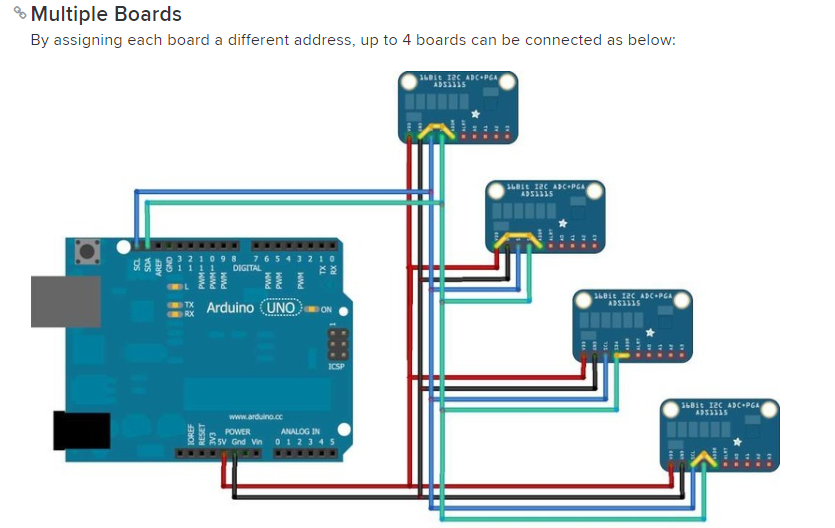
我们要尤为注意的是,图中除了基础连接外,我们的 ADDR 接口还要和相应的接口进行连接。

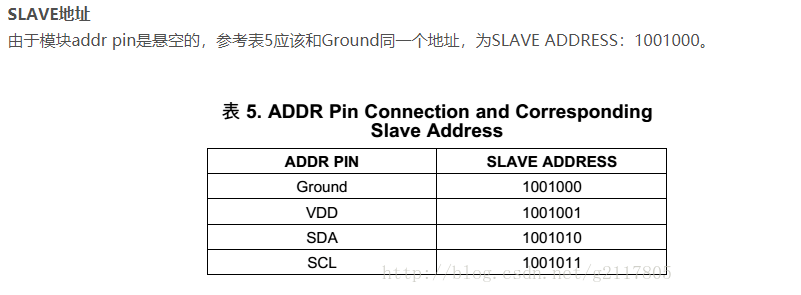
每个器件可以使用不同的地址引脚配置,将最多四个ADS111x器件连接到单个I2C总线。使用地址引脚将ADS111x设置为四个不同的I2C地址之一。首先使用GND,VDD和SCL地址。如果使用SDA作为器件地址,则在SCL线变为低电平后至少保持SDA线至少100 ns,以确保器件在I2C通信期间正确解码地址。

所以,我将线改成下图进行连接。

按照图连接成功后,我们就可以进行下一步。

ADS1115 的地址可以通过 ADDR 与SDA、SCL、GND 或 VDD 短接,实现修改。不设置的话,默认值为 0x48。

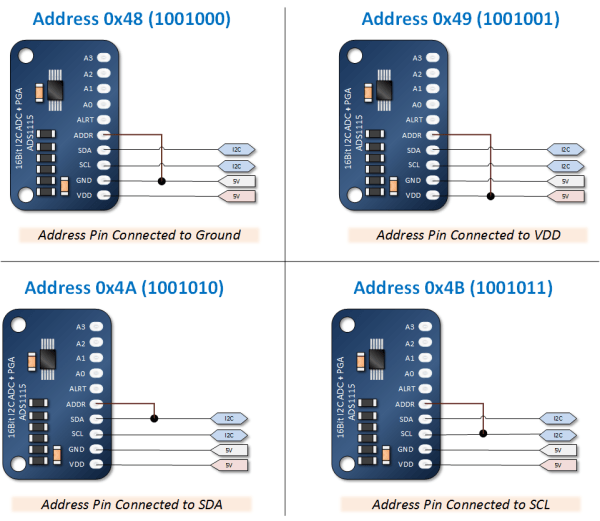
每一个器件都有一个唯一地址,也就是和 ADDR 相连接的器件地址,我们就是靠这个地址来区分 ADS1115 的。

按照连接图连接好线路之后,下一步就是编写代码。代码直接给出,我用的是两个 ADS1115 的并联,分别连接的是 VDD 和 GND 。

代码细节

下面的代码就是用地址来区分 ADS1115 的。

1
2
adc1 = Adafruit_ADS1x15.ADS1115(address=0x48)
adc2 = Adafruit_ADS1x15.ADS1115(address=0x49)

完整代码如下

1
2
3
4
5
6
7
8
9
10
11
12
13
14
15
16
17
18
19
20
21
22
23
24
25
26
27
28
29
30
31
32
33
34
35
36
37
38
39
40
41
42
43
44
45
46
47
48
49
# Simple demo of reading the difference between channel 1 and 0 on an ADS1x15 ADC.
# Author: Tony DiCola
# License: Public Domain
import time

# Import the ADS1x15 module.
import Adafruit_ADS1x15


# Create an ADS1115 ADC (16-bit) instance.
adc1 = Adafruit_ADS1x15.ADS1115(address=0x48)
adc2 = Adafruit_ADS1x15.ADS1115(address=0x49)
# Or create an ADS1015 ADC (12-bit) instance.
#adc = Adafruit_ADS1x15.ADS1015()

# Note you can change the I2C address from its default (0x48), and/or the I2C
# bus by passing in these optional parameters:
#adc = Adafruit_ADS1x15.ADS1015(address=0x49, busnum=1)

# Choose a gain of 1 for reading voltages from 0 to 4.09V.
# Or pick a different gain to change the range of voltages that are read:
# - 2/3 = +/-6.144V
# - 1 = +/-4.096V
# - 2 = +/-2.048V
# - 4 = +/-1.024V
# - 8 = +/-0.512V
# - 16 = +/-0.256V
# See table 3 in the ADS1015/ADS1115 datasheet for more info on gain.
GAIN = 1

print('Press Ctrl-C to quit...')
while True:
values = [0]*8
# Read the difference between channel 0 and 1 (i.e. channel 0 minus channel 1).
# Note you can change the differential value to the following:
# - 0 = Channel 0 minus channel 1
# - 1 = Channel 0 minus channel 3
# - 2 = Channel 1 minus channel 3
# - 3 = Channel 2 minus channel 3
for i in range(4):
values[i] = adc1.read_adc(i, gain=GAIN, data_rate=128)
values[i + 4] = adc2.read_adc(i, gain=GAIN, data_rate=128)
# Note you can also pass an optional data_rate parameter above, see
# simpletest.py and the read_adc function for more information.
# Value will be a signed 12 or 16 bit integer value (depending on the ADC
# precision, ADS1015 = 12-bit or ADS1115 = 16-bit).
print('| {0:>6} | {1:>6} | {2:>6} | {3:>6} | {4:>6} | {5:>6} | {6:>6} | {7:>6} |'.format(*values))
# Pause for half a second.
time.sleep(0.5)
请我喝杯咖啡吧~